How To Animate in Unreal Engine 5 | Part 1
Summary
TLDR本视频教程由Cliff主讲,他将分享如何在Unreal Engine中直接使用控制骨骼(Control Rig)来制作短动画或打斗场景。Cliff拥有7年在Unreal Engine中制作打斗动画的经验,他将逐步指导观众如何在游戏引擎内创建快速打斗场景。视频还介绍了如何利用Le Art Studio的资源和环境来搭建场景,并提供了独家折扣码,以便观众以优惠价格获取高质量的游戏就绪资产。
Takeaways
- 🎥 介绍了如何使用Unreal Engine的Control Rig直接在游戏引擎中制作动画。
- 🥋 通过教程,即使是初学者也能学会在Unreal Engine中制作简单的打斗场景。
- 🌟 讲解者Cliff拥有7年在Unreal Engine中制作打斗动画的经验。
- 📹 教程将涵盖Maya和Blender中的技巧,并将其应用于Unreal Engine。
- 🏢 推荐使用Le Art Studio的高质量游戏就绪资产来构建环境。
- 🎁 提供了Le Art Studio的独家折扣码,用于购买他们的资产包。
- 🛠️ 展示了如何在Unreal Engine中设置环境和角色,以及如何开始动画制作。
- 🎬 介绍了如何在Unreal Engine中使用Control Rig进行角色动画的基本步骤。
- 🔧 讨论了如何调整角色姿势和动作,以及如何设置关键帧。
- 📈 强调了在动画制作中,对角色动作的夸张和细节的重要性。
- 🔄 说明了如何复制和调整关键姿势,以创建流畅的动画循环。
Q & A
如何直接在游戏引擎中创建动画?
-通过使用Unreal Engine的Control Rig功能,你可以直接在游戏引擎中为你的角色创建动画,包括打斗场景。
Cliff在Unreal Engine中有多少年的动画制作经验?
-Cliff在Unreal Engine中制作自己的打斗动画已经有超过7年的经验。
Le Art Studio提供了哪些类型的游戏就绪资产?
-Le Art Studio提供了包括环境、角色、道具、材质和3D模型在内的各种游戏就绪资产。
如何获取Le Art Studio的折扣代码?
-使用折扣代码'Round Table animation 30'可以在Le Art Studio的商店中获得30%的折扣。此外,还有限时的Mega折扣,使用代码'rtsa 70'可以获得70%的折扣。
在Unreal Engine中设置环境的第一步是什么?
-首先需要在Unreal Engine的项目文件夹中解压缩环境文件,然后双击场景文件并选择引擎版本来打开场景。
如何在Unreal Engine中添加角色?
-通过打开Epic Games的Tab,进入市场,搜索并选择Control Break样本包,然后添加到项目中来添加角色。
在Unreal Engine中,如何调整动画的帧率?
-可以通过更改时间线上的设置来调整动画的帧率,例如将其设置为每秒24帧。
如何在Unreal Engine中设置角色的动画关键帧?
-使用自动关键帧功能(Auto Key),在移动控制部件后,系统会自动放置关键帧。也可以通过选择主控件(Master Control)来为整个角色设置关键帧。
在Unreal Engine中,如何创建更加夸张的打斗动画?
-通过夸大角色的动作,比如增加旋转和弯曲的程度,以及调整角色的姿态来创建更加夸张的打斗动画。
如何在Unreal Engine中调整角色的光照和阴影?
-通过调整方向光(Directional Light)和天空光(Skylight)的设置,可以改变角色的光照和阴影效果。
在Unreal Engine中,如何实现更加电影化的视角?
-通过添加Cinematic相机并调整其位置和焦距,以及激活景深(Depth of Field)效果,可以使视角更加电影化。
Outlines
🎬 动画制作入门:Unreal Engine控制装备介绍
本段介绍了如何在Unreal Engine中使用控制装备来制作动画,特别是打斗场景。主讲人Cliff分享了他的经验,他使用Unreal Engine制作打斗动画已有7年时间。这个教程系列将帮助初学者了解如何在游戏引擎中直接制作快速打斗场景。Cliff还提到了他之前为Maya和Blender创建的打斗场景教程,并强调虽然本系列不是Unreal Engine的初级课程,但会详细解释每个步骤,以便观众能够跟上。此外,他还提到了Le Art Studio提供的高质量游戏就绪资产,以及如何使用折扣代码获取这些资源。
🛠️ 设置环境和角色:Unreal Engine的工作流程
这一部分详细介绍了如何在Unreal Engine中设置环境和角色,以便开始动画制作。首先,Cliff指导观众如何在引擎中打开和设置环境,包括如何使用不同的地图版本和处理环境中的各种资产。接着,他解释了如何导入控制装备,并在引擎中设置角色。他还提到了如何使用不同的视图和工具来优化工作流程,包括如何调整光照和深度场来改善场景的外观。
🎥 动画制作技巧:打斗姿势的创建
在这一段中,Cliff开始教授如何在Unreal Engine中创建打斗姿势。他首先展示了如何设置角色的基本打斗姿态,并逐步调整角色的腿部和手部动作来形成更加动态的姿势。他还讲解了如何使用自动关键帧功能来捕捉和设置关键动作,以及如何通过调整关键帧之间的时间间隔来控制动画的速度和流畅度。此外,Cliff还分享了一些关于如何使打斗动作看起来更加夸张和真实的技巧。
🥊 打斗动画的细化:关键帧和姿势调整
本段中,Cliff继续他的教程,专注于如何细化打斗动画中的关键帧和姿势。他讲解了如何通过调整关键帧来创建更加流畅和有力的打斗动作,包括如何设置角色的预期动作和实际打击动作。Cliff还展示了如何通过复制和调整关键帧来创建连贯的动画循环,以及如何通过微调姿势来增强动画的视觉效果。他强调了在动画制作中细节的重要性,以及如何通过细节来提高动画的质量和观众的沉浸感。
🎞️ 完成打斗动作:动画的最终调整
在这段视频中,Cliff完成了对打斗动作的最终调整。他展示了如何通过夸张和细化动作来增强打斗的真实感和视觉冲击力。Cliff还讲解了如何使用Unreal Engine中的深度场效果来增强背景的模糊效果,以及如何通过调整关键帧来控制动画的节奏和速度。最后,他提到了在下一视频中将继续添加更多动作,以构建完整的打斗组合。
Mindmap
Keywords
💡Unreal Engine
💡Control Rig
💡Animation
💡Fight Scene
💡Blender
💡Le Art Studio
💡Dope Sheet
💡Outliner
💡Keyframe
💡Depth of Field
💡Cinematic Camera
Highlights
Unreal Engine now supports direct animation of characters with the Control Rig feature.
This tutorial series will guide you through animating a fight scene directly in the engine using Control Rig.
The presenter, Cliff, has 7 years of experience creating fight animations in Unreal Engine.
The tutorial will not cover basic Unreal Engine operations but will focus on animation principles applicable to any program.
Le Art Studio provides a wide range of game-ready assets, including environments, characters, and props.
A special discount code 'Round Table animation 30' is available for 30% off on Le Art Studio assets.
A limited-time Mega Discount offers 19 high-quality packs, including a tutorial on level creation, at a significant discount.
The Boxing Club environment from Le Art Studio is part of the pack used in the tutorial.
The Control Rig pack, a free sample pack from Epic Games, is introduced as a resource for character rigs.
The tutorial demonstrates how to set up a character for animation using the Control Rig in Unreal Engine.
The process of creating a fighting stance and punch animation is detailed, including key pose setup and timing adjustments.
Depth of field and camera focus settings are adjusted to enhance the cinematic quality of the animation.
The importance of removing unwanted snapping and clutter from the viewport is emphasized for a clearer animation workspace.
The tutorial showcases how to use the auto key feature for efficient key placement during animation.
The presenter demonstrates how to create anticipation and follow-through in a punch animation for a more dynamic effect.
The use of key poses and looping in animation is explained to achieve smooth and repetitive motion sequences.
The next video in the series will add more moves to create a full combo animation.
Transcripts
so you're seeing all these new cool
features from a real engine and want to
make your own short film animation or
fight scene but the problem is that you
animate in another program and sometimes
transferring over data from one program
to another can get pretty tricky well up
games has launched control rig and
ability to animate your characters
directly in the game engine now you can
make a character Punch Kick and fight
like those you see in your favorite show
or game but it's still a little scary
the first time you open up a real engine
this is going to be a step-by-step t
series on how to animate a quick fight
scene directly in engine with the
control rig my name is Cliff and I made
my own fight animations in un real
engine for over 7 years and this
tutorial series will help you get
started the plan is that at the end of
this series you will pick up the
knowledge and tools necessary to create
your own fight animation to start things
off I have created other fight scene
tutorials for Maya and blender and I'll
be breaking down those same tips here as
well in the blender series I created a
slightly more complicated short fight
scene than the one in Maya but for this
one we're going to go back to the symol
combo even though I will be breaking
down how to create an animation unreal
the principles here can be applied to
any program this is not a beginner
Unreal Engine course I will go slow and
explain everything that I'm doing but I
wouldn't consider this a how to an
onreal engine tutorial I'm also not
planning to go into any deep Advanced
features just yet like creating your own
control rig I really wanted to do
something simple that anyone can pick up
the environment I am using is the
stylized Boxing Club from leard Studio
one of the main reasons I transitioned
from rendering in my in blender in
strictly using Unreal is the environment
finding quality assets that fit together
creating in the environment and then
lighting that environment to make it
look professional and then is a huge
Time s no matter which animation program
you prefer not only do most if not all
Unreal Engine environments come with the
default stage that you can use to start
your environment it almost feels like
playing a video game when it comes to
building your own custom environment and
there's no best place to start than with
the series sponsor Le Art Studio they
offer a wide range of game ready assets
including environments characters props
materials and threein models so leard
has hooked us up with own discount code
Round Table animation 30 that you can
use at checkout from gumro for any of
the assets in the store for 30% off on
top of that they're running a limited
time Mega Discount of 19 high quality
packs that include the cyberpunk lab a
Roman Street environment and even a
tutorial on how to create levels each
one of these assets is probably going to
go for 50 to 60 to even $100 the entire
pack all included they practically give
away for $100 for the entire thing but
they reached out and really like what
we're doing over here with on real
engine and prepared us with our own
crazy discount code that doesn't take
only 30 but actually 70% off the entire
pack so you can get this entire thing
for just $30 make sure to use our
discount code rtsa 70 at checkout and
get some really high quality looking AAA
style environments not only do you guys
benefit but doing so supports the
channel the boxing club environment I am
using is a part of the pack but of
course you can use any environment for
the tutorial if you are Dow your
environment make sure to unpack it in
your un real projects folder double
click on the scene file select the
engine version and open up the scene
okay so once you have your environment
opened we need to go ahead and get some
rigs here so the next thing I'm going to
do is I'm going to open up my epic games
Tab and I'm just going to go
to the
marketplace and I'm going to look for
control break
now I have it already but what I want to
do is get this control rig pack which is
a sample pack which is free from epic
games I'm going to click on it and I'm
going to add to project right so when I
click add to project I'm going to pick
the project that I want to bring it
to
and
add all right and once everything is set
up our rigs or at least our basic rigs
is automatically going to be added into
the into the file so you can see now I
have my environment and my control rig
right in my file so from here as great
as this
sample look of our assets is we probably
want to make it look more like a scene
so in most files or most environments
that come within real engine they come
with like a sample version of how that
environment would look with all the
assets put together um so from here I'm
going to go into the boxing club folder
go into maps and then pick which one you
want so the overviews I believe was what
we have open here anyway right you can
see overview editor which is what this
is so you have a level day and level
night now you can pick either or I'm
sure the exactly the same besides the
fact that one's probably a lit different
but I'm going to pick level
day so from here you'll see that our
environment opens up and looks a lot
better than the overview look of what I
had before now you'll see all these
little um I guess buttons or different
icons and these are just the icons for
whatever is attached to the the asset to
the field so this means that it's
attached to the floor this one is the
lighting um well the the reflection
capture this one is another reflection
capture so every single one has a little
icon attached to it um I believe this
one that's probably the the ring
so so for here in order to not
necessarily see them right away I'm
going to click on um this hamburger icon
go down to the game menu and just kind
of click that so now that we have our
environment set up it's time to go ahead
and bring in our characters so from here
I'm going to go to boxing I'm going to
go back out and I'm going to just search
actually come back out to content now I
can go in here and look into my
characters now we have a couple of
characters right like you saw that
sample pack that has the mesh um so you
can go into your Rigs and look for the
control rig so this is one I'm going to
pick right so I believe there's a couple
of them but I believe this one has more
detail than the other this is more of a
basic version of it and this one has a
lot more details which is the one that
we're going to need for our fight scene
so I'm going to click hold and
drag and bring it out to
ourc right so now when I have placed a
character to the scene now that you see
him here uh a few menus popped up right
we have our secr menu which is going to
be um our way of kind of is
our is our dope sheet if you're from
blender um in a way to go ahead and see
all of the keys that we have so all of
our controls are down here and we'll be
able to go ahead and kind of see exactly
where the keys are on the tit line so
that's what the sequence and menu is
here this is our outliner just in case
if we wanted to go ahead and mess with
mess with controls or anything like that
this is usually at least from what I've
used so far um used in the rigging
process I'm sure it has some use with
the animation I just haven't got a
chance to see that yet everything I've
seen is just using the dope sheet um and
believe our outliner just showcased that
this is now onto the into the into the
scene so from here I'm G to do a few
things in order to go ahead and start
the animation process um the first thing
I'm going to do is we have at least in
this environment outline situation here
cuz look the 2D effect I'm going to
remove that uh it's a post process I'm
going look post and there there it go so
it's going to have an outline uh this
takes care of some effects but this is
the one I wanted to remove um that's the
first
thing then I'm going to change this to
24 frames per
second right and then we're going to set
our character up for
animation
so in order to set the character up for
animation um what that also entails is
when I removed the icons for game view
that remove the controls as well so once
I bring it back you'll see that all the
controls are are back but it's still
kind of messy R is still a little messy
and I want to clean it up just a bit I
haven't seen a way to go ahead and just
remove the other icons and leave the
controls as a way to go ahead and remove
um the control rate controls and leave
everything else out but not necessarily
reverse but I found a little workaround
for myself that works for
me what we're going to do is we're going
to just kind of put this away a bit just
bring this down bring this out it kind
of gives a little bit of a better view
uh we're going to animate right here in
this area and I'm going to take this
viewport is very similar to how I would
do it in blender or bio and I'm going to
combine the vi the viewport the same way
I would if I was animated to be side by
side right so from here now I have two
views two camera
views to see the
character I'm going to bring this one up
a little bit closer to our character
this is going to be my working file I'm
be going in and out with this file and
this is going to be exactly what I see
after the fact so I'm going
to add in a
camera so go up here cinematic and we're
going to add us a camera
right so once we add in a camera that
gives us another view of of actually
changing up what we see through that
camera and much more customizable than
the perspective view cu the perspective
view is going to give you just a plain
view of everything whereas the camera
view can actually give you a little bit
more a lot more actually control than
what you can nor
see so from here I'm going to switch
from camera from this perspective view
instead of the other views down to my
camera
view which going to show the some of the
other cameras that came in with the
scene but I just want to use our camera
view and moving that over to the side
here to look for my
character there we
go so now you can automatically feel
that it feels a lot
more cinematic right it's given like a
little bit more of a uh we're actually
looking through a camera lens because of
the um because of the uh the camera
setup so from here I'm going to now
remove
everything and I'm still that crazy
about um the lighting so let's see if we
can even increase the light a little
bit that's go to our directional light
to our details let's see have bring up
to
eight
nothing so directional light doesn't
change
anything all right so our Skylight has a
little bit more
control all right there we go that's
what I was looking for so sets of four
at first so let's change to
six 10 that's a little better that's
enough to give us a little better view
all right so another trick that is going
to be good at least for
me another trick that's going to be good
to be able to kind of view everything is
I'm going to activate the depth of field
to kind of just uh blur out this
background I'm going to go back and I'm
going to find my camera if there's a lot
of assets here and you're looking for
your camera I would just type it in
instead of looking for it let's look for
our camera The Cinematic camera that we
entered we're going to switch back to
our Focus settings and we're going to
change this Focus setting to about
55 now it looks like we just zoomed in
but what we did is kind of give the
option to go and separate the background
from the for ground this right now is
set to the standard of I believe a
million cm of f Focus I'm want to bring
that all the way down all the way down
there we go so a good way to also see
exactly how to separate the forward from
the back especially on real engine is to
kind of draw this debug thing um this
debug frame and what that does it
actually gives you a um like a
little plane that kind of of crashes and
let you know exactly where the camera is
registering um this Focus or not so if
we do ref from right behind the
character and then you you know change
it it kind of gives you just a better
view it may not be too too diff
different if you can want to see it
stable it's a little bit clear manual
may not necessarily see too much of a
difference um if you want to CH more of
a difference you can try
to
come in a little bit
closer right and then bring it more as
you can see a little bit Focus but
that's not going to be our working
animation view but for me it gives a
little bit um a little bit more
of a clear look of what we're going
through so now from here before we start
actually
animating and now that I have my
character here let's go ahead and start
animating
so I'm going to start with my fighting
stance but rotated and this is also so
you can see how it's snapping here we
want to remove that by just un
unchecking here so that no it no longer
snaps so you're going to have a nice
clear look and you can see it
automatically um updates on both sides
so we can see exactly what's going on so
I'm going to start my fighting sance I'm
going to start with my legs
here oh same thing here that's let's go
ahead and remove
this now open this up
send and we're going to start our
fighting
stance just bring the character to bend
a little
bit
and that's it's not so bad at starting
to POS that in Onre engine I think it's
it's a pretty intuitive system for the
control rig you can definitely get the
same type of feel as you would if you
were animating Anaya or
blender let see let's get this down
got angle to where our point would
be bring our shoulders
up
ah hello sing in
here
okay so now we should have a little bit
of a good
look before we go attack those fingers
of our pose of our first
pose but I'm going to get a little bit
of a stronger
stance
it's a little bit of a stronger stance
here to go to that fighting
po now from here we're going to go ahead
into the fingers get a little bit closer
there and these green controls control
the whole finger curve so it's going to
rotate
in or we can combine the
rest this gets a little bit of a wonky
rotation that should be
good
oh man so first one is done and I think
it looks pretty good if you look at over
here looks pretty pretty good here and
then we're going to do the same onto the
other
side
and we'll go ahead and curve this in I
actually don't like do it all curves
like that I might just I may just do it
individually
man not sure why on this one it's
curving at a different
angle there but once we kind of get it
adjusted it should be
fine that one I
wanted
C up this
thing
just make sure it looks pretty could
before moving
forward
good
okay perfect and that's our first pose
in un real engine than standard fighting
pose you know you can go ahead and tweak
it up a bit more you know it can bring
this um bring this up closer to his um
to his face if you
want but right now it's
pretty
it's pretty good like
this switches back to 24 good as s i
that before
but all right so now we have that we
going ahead and set our keys so I had
auto key I didn't have auto key on um
this is our auto key button so once you
click this at least now going forward it
will be able to go ahead and kind of
automatically place our keys once we
move a control so the first thing I'm
going to do is going to click on this um
going forward that way we can have our
keys automatically placed but you'll see
here that not all the keys are placed
all the ones that we moved already um
any the the finger ones but some of the
ones don't have keys and we want to have
keys on everything at least on a
starting frame because if we didn't move
the character any sort of way going
forward we don't have an established
starting point so then move to the top
and then you're going to see this master
control here um that on top of all the
controls and once you click that um it
sets a key for the entire character all
the way down so you don't have to worry
about that for now so now what I'm going
to do is go at least go by five
frames all frame five take it here I
believe can make this a lot small we
don't need all of these uh all these
these frames here let's go down to
here
50
so so now we're going to go into our
next post here will be our anticipation
post I start with the feet
kind of go forward towards a little bit
rotating
it
CH so rotating feet just a
bit and now that
I have turned auto key on you'll see
that it'll automatically start placing
some keys there
too
Y no sit home
fire
so we have a little bit of a drag
there just do it to a bit more and then
that way we kind of can really space out
out to get this punch pose and let's
bring up the arm a bit rotate it bring
it
back just another that character kind of
has a little bit
to
convey uh what he's about to do
it's so arm there I think look pretty
good if you look at it from one side to
the other we start from our first
framing going to here you see that we
have a little bit of our poses here
jumping from
one to the other
right
okay
so then from here we're going to go I
personally will just lock in all those
poses and do another um set there and
then go to frame 10 to do the last P
which is the actual punch
pose so we're going to have a
full rotation
hit
and we're going to do everything to
really kind of get that job right
across
back a bit keeping his head
forward
all right now here we now while we do
have a standard looking punch we're
going to go ahead and just give it a bit
more exaggeration onto the
poles really get
this Bend in here and rotation
sl's hitting more of the
center kind of get this out the
way and then now we have a much more of
a solid punch posst
here all right and look at that
anticipation punch and then comes back
see it it's very smooth like now I now I
know you can see some particles there if
if runers um and that's
just my graphics card and i' be able to
keep up but if you even have it on unlit
has a much more of a clear way of
showing the pulse and even you can use
this as a working model but for me the
depth of field kind of brings it out a
bit or it's kind of cool to see exactly
what it looks like at the same
time
but right there you
go now so what we're going to do to
finish this pose is just to kind of copy
the keys that we have here and just kind
of bring it back so even though right
now I'm kind of just dragging it back
but what we get do is have the same idea
for those poses um to do it on its
own so from here we're going to collapse
all of this to bring it up to these just
three key posers right one two 3 right
so if I wanted to do extra keys in the
middle there I can but we're going to
keep these key poses we're going to take
this middle
one and duplicate it
and just drag this
out so now if you look he brings it back
a bit right um we'll do 15 for now but I
feel that it's going to be a very
uniform
look or it could be pretty Snappy
actually depending on the look of it
actually it's a pretty Snappy
punch and for the final
po
duplicate click
drag made to frame
20 so that's a very and if we bre it all
the
way to the top I would say that is a
very uniform looking pose and to Loop we
click here to loop our
Playbook so even if I at least gave it a
little
bit so from here if you're familiar with
any other animation programs you will
know that you can be able to adjust the
speed and timing depending
on the keys here so if I want a quicker
punch right I'll move this up
one I'll bring this up one probably keep
this here and then bringing it low so
that way at least the launch is
quicker and then it comes back and this
is kind of more of how to do in fighting
games right you kind of want to give the
opponent the least amount of time to be
able to recover so you kind of have
those poses come pretty
quick and that's how I love how look I
already love how smooth it kind of looks
right you kind of bring it back so even
if I want to bring this up one he kind
of can as well
and that probably looks the best right
boom comes back pretty quick back to the
star and
post all right and that's our first
pose all right and that's our first
combo in Unreal Engine in the next video
we're going to add in more moves and to
make this a full combo I'll see you guys
there
5.0 / 5 (0 votes)

I Survived 100 Days as an ELEMENTAL WARDEN in Minecraft
How to Optimize Performance in Unreal Engine 5
This Effect Makes Your Videos Look Super Smooth
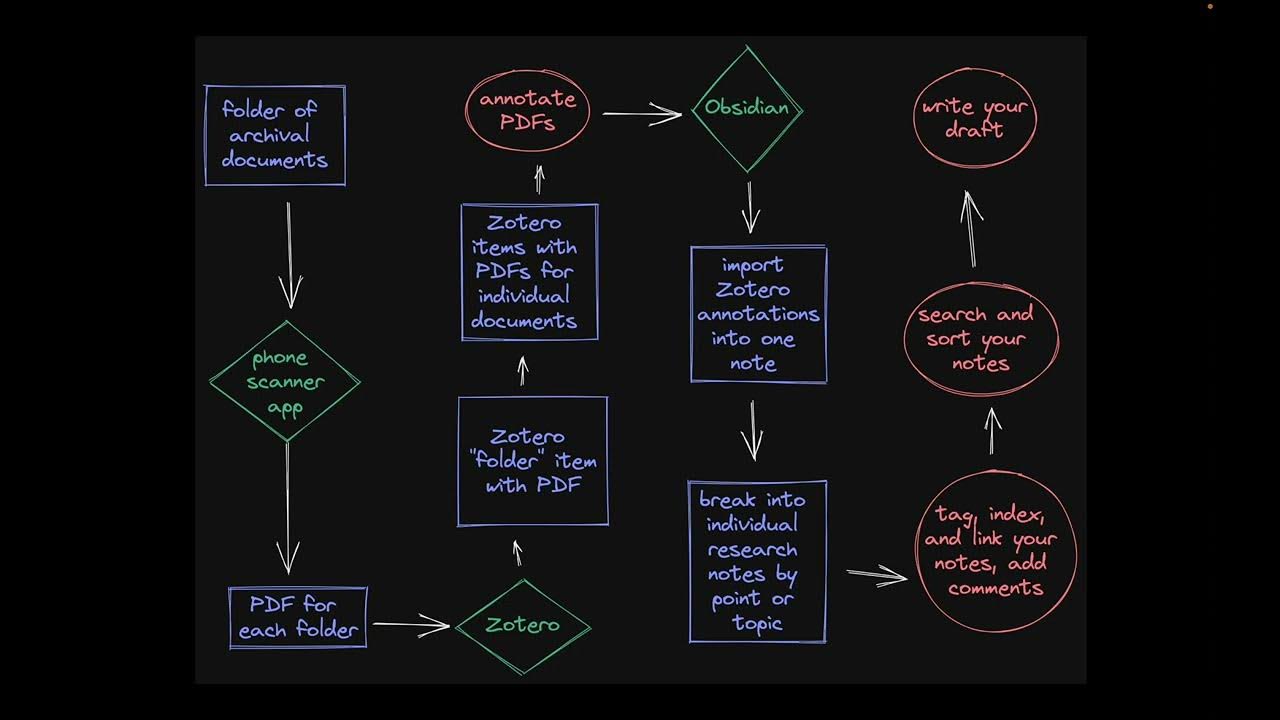
Doing History with Zotero and Obsidian: Archival Research

6款工具帮你自动赚钱,轻松上手帮你打开全新的收入渠道,赚钱效率高出100倍,用好这几款AI人工智能工具,你会发现赚钱从来没如此简单过
FREE writing software | Longform and shortform