Beginner's Guide to ControlNets in ComfyUI
Summary
TLDR本视频介绍了如何使用控制网(Control Nets)来精细调整图像生成的效果。通过讲解不同控制网模型的安装和应用,以及如何通过预处理和调整参数来优化输出图像,视频详细展示了如何从线提取器(Canny)中提取图像特征,并结合深度图和风格图像来生成具有特定主题和光线效果的插图。此外,还探讨了控制网对计算资源的需求,并提供了如何平衡不同图像元素以获得理想结果的实用技巧。
Takeaways
- 📌 控制网(Control Nets)是一种工具,用于根据图像的不同特征控制生成的图像外观。
- 🔍 当控制网检测到图像中有红色时,需要去管理器(manager)安装缺失的节点。
- 🛠️ 要使用控制网模型,需要先在管理器中安装模型,并搜索相应的控制网模型。
- 🌟 Canny控制网是一种线提取器,可以将图像转换成黑白线条绘图。
- 🔄 控制网需要预处理,可以连接预处理器直接到控制网中。
- 🎨 使用控制网时,可以通过调整不同的参数来控制生成图像的最终效果。
- 🏞️ 通过调整深度图(depth map)中的数值,可以改变图像的深度感知和构图。
- 🖼️ 控制网可以与正负样本(positive/negative)结合使用,以进一步细化生成的图像。
- 💡 控制网的计算成本较高,可能会减慢处理速度,但对于拥有高性能显卡的用户影响较小。
- 📚 视频中提到了多个控制网模型,如Canny、OpenPose、Sketch等,它们都遵循相似的工作方式。
Q & A
控制网(Control Nets)是什么?
-控制网是一种用于图像生成的工具,它通过分析图像的不同方面来控制生成图像的外观。例如,Canny控制网是一种线提取物,它可以从图像中提取出黑色的线条绘图。
如何安装缺失的控制网节点?
-如果在使用控制网时遇到红色提示,表明有节点缺失,此时应前往管理器(manager)安装缺失的节点。
控制网模型应该如何获取?
-要获取控制网模型,需要前往管理器(manager),选择安装模型(install models),然后搜索控制网(control net)以获取不同的模型。
Canny控制网的作用是什么?
-Canny控制网是一种线提取物,它通过分析图像并创建一个黑色线条的绘图,从而提取物体的轮廓。
控制网需要进行哪些预处理?
-控制网在工作前需要进行预处理。预处理可以通过连接预处理器(pre-processor)直接到控制网来进行。预处理中可以调整一些参数,如分辨率和背景阈值等。
如何使用控制网生成深度图?
-要生成深度图,首先需要将输入图像和控制网模型连接到工作流中,然后运行正向和负向的条件设置,最后将结果应用到采样器中。
控制网中的强度(strength)参数有什么作用?
-强度参数用于控制控制网对生成图像的影响程度。数值越高,控制网的影响就越强。
控制网中的开始和结束百分比(start and end percent)如何影响结果?
-开始和结束百分比参数用于控制控制网在生成过程中的影响范围。例如,如果设置开始为5,结束为10,则控制网将从生成过程的第5步开始影响,并持续到第10步。
如何使用控制网改善图像的质量和风格?
-可以通过调整控制网的参数,如强度、开始和结束百分比等,以及选择合适的控制网模型和预处理参数,来改善生成图像的质量和风格。此外,还可以结合使用不同的控制网,如Canny和深度控制网,以达到理想的效果。
控制网在计算上是否昂贵?
-是的,控制网在计算上是相对昂贵的,因为它需要更多的计算资源来分析图像并生成结果。不过,如果用户拥有高性能的图形卡,通常可以很好地处理这种计算负担。
在使用控制网时,如何选择合适的模型?
-选择合适的控制网模型需要根据图像的特点和生成目标来决定。例如,如果需要提取图像的轮廓信息,可以选择Canny模型;如果需要深度信息,则选择深度模型。用户可以根据自己的需求和偏好来选择最适合的模型。
Outlines
📌 控制网基础与应用
本段落介绍了控制网(control nets)的基本概念和应用。控制网是一种用于影响图像生成的工具,通过预处理和加载模型来实现。首先,需要在管理器中安装所需的节点和模型,然后通过控制网来调整图像的不同方面。视频中提到了多种控制网模型,但主要关注了Canny边缘提取器,它能生成图像的黑白线条图。通过控制网,可以调整图像的生成效果,例如通过改变参数来控制图像的深度映射。此外,还讨论了控制网的计算成本,以及如何通过调整参数来优化生成结果。
🎨 控制网参数调整与效果展示
这部分内容深入探讨了控制网参数的调整及其对图像生成效果的影响。通过调整控制网的强度、开始和结束百分比等参数,可以改变生成图像的外观。视频还展示了如何使用不同的控制网模型,并解释了这些模型如何影响图像的各个方面。此外,还讨论了如何通过改变噪声水平来调整图像的细节程度,并通过实例展示了如何结合多个控制网和提示词来生成具有特定风格和元素的图像。
🖌️ 应用Canny控制网进行图像处理
这一部分详细介绍了Canny控制网的应用过程。Canny控制网主要用于提取图像的边缘信息,生成线条图。视频首先展示了如何准备和处理输入图像,并解释了如何选择合适的控制网模型。然后,通过设置提示词和调整参数,展示了如何使用Canny控制网生成具有特定风格和元素的图像。此外,还讨论了如何通过调整控制网的强度和其他参数来优化生成效果,并通过实例展示了Canny控制网在图像生成中的有效性。
🔍 控制网的类型与选择
最后一部分视频脚本总结了控制网的不同类型及其用途。除了Canny和深度控制网之外,还提到了其他类型的控制网,如动画、开放姿态、草图等。每种控制网都有其特定的应用场景和功能。视频强调了预处理在控制网中的重要性,并简要介绍了如何使用不同的控制网模型。最后,视频鼓励观众尝试和探索不同的控制网,以找到最适合自己需求的工具。
Mindmap
Keywords
💡控制网
💡Canny模型
💡
💡深度图
💡预处理
💡图像生成
💡Lora
💡正则化
💡固定种子
💡负样本
💡正样本
💡迭代
Highlights
讨论了控制网络(Control Nets)的概念,这是在图像生成中用于控制输出外观的一种工具。
控制网络在生成图像时可以基于图像的不同方面进行预处理。
介绍了Canny模型,这是一种线条提取器,可以将图像转换为黑白线条图。
解释了如何通过管理器安装模型来获取不同的控制网络模型。
强调了控制网络在调整图像生成时的灵活性,可以通过调整不同的参数来实现不同的视觉效果。
展示了如何将控制网络与深度图结合使用,以增强图像的深度感。
讨论了控制网络的计算成本,指出它们可能会减慢图像生成过程。
提供了如何调整控制网络强度的指导,以及如何通过调整D噪声来平衡不同图像的影响。
展示了如何使用控制网络来改变图像的风格,例如将青铜雕塑转换为水彩画风格。
介绍了如何使用提示(prompts)来引导图像生成的方向,包括正面和负面的提示。
解释了如何通过调整控制网络的参数来控制图像生成的强度和细节。
展示了如何使用控制网络来实现特定的视觉效果,如将图像转换为具有特定光照和颜色的风格。
讨论了控制网络在图像到图像的转换中的潜在应用,以及如何通过迭代来优化结果。
提供了关于如何使用不同的控制网络模型(如Canny、深度、OpenPose等)的见解。
强调了在图像生成过程中,理解和调整控制网络参数的重要性。
展示了如何通过控制网络实现复杂的图像转换,例如将现实图像转换为幻想风格的插画。
讨论了控制网络在艺术创作和设计中的应用,以及它们如何帮助实现创意视觉目标。
提供了关于如何将控制网络与其他图像处理工具结合使用的实用技巧。
Transcripts
so here we are in comfy again and we're
going to look at very briefly at another
aspect of comfy and you'll soon come
across I'm sure which are control Nets
and these are control Nets you'll I'll
put this workflow in and uh if these
come up with uh red then you go to
manager and install missing nodes you
will however also need to go and get the
control net models to get those you go
to manager install models and search for
control net so there are a lot of
different models and there are a lot of
different kinds of control net I'm going
to only deal with canny which is a line
extractor which essentially makes a
black line drawing of your image and the
depth once you have grasped how they
work the other ones all work the same
and and I think you'll be able to find
find your way through them but there's
there's poses and uh all sorts in there
there's quite a few different ones
there's too many to go through so I'm
I'm going over the underlying principle
of uh how they work they basically all
look at different aspects of an image
and use that to control uh what the
generation looks like so one aspect of
control Nets is that they need
pre-processing in now you can hook up
the pre-processor to feed directly into
it I don't I always I don't I always
pre-process
preprocess I going messed that and um
and then load the image in because in
the pre here you want to you might want
to mess around with uh these numbers
here which we'll we'll go into in a
second so it's not necessarily one shot
put it in and it comes out the other end
and then going to apply the control net
here so first of all uh this is a video
that comes after putting lauras in so we
have luras in here from the previous
video and the previous video you should
probably watch them in sequence but you
don't have to right so first of all uh
I'm assuming you've been to manager and
installed all the bits and pieces you
need so you'll be faced with this when
you've found the nose or when you
download my workflow so I'll just go
over how to Plum it in it is very simple
indeed so your input image your depth
map goes in there your control net model
goes in there and then you run your
positive from your you see the
conditioning here and the
positive and then the
positive back into the sampler and
exactly the same thing with the negative
negative back into the
S and that's it that's your control net
wi up so what we need to do we're going
to work with this image here but any
image so we're going to do a landscape
image so the first thing to do is to
turn off these so you go right click on
your group see group here and you can go
set group to never you see that set
group to never and then this group won't
do anything it'll just sit there and you
can do the same with this one though you
don't really need it so now we're just
going to work to make our depth M so we
choose our file there it is and we'll
just run that and see what comes out
there you go so that's what looks that's
what a depth map now you can alter these
numbers here this is the resolution it
looks at the image so it's breaking it
up into 512 squares you don't really
need to know about that and this is the
background the threshold so this is how
black it is and how white it is and so
on I would leave these settings uh alone
and you can mess with them afterwards
once you these images the thing is to
change these numbers and see what happen
so the way this works is pale stuff the
whitest stuff is the nearest stuff and
the darkest stuff is the further away
stuff okay so uh this image you can
right click it and go open image and
then you can drag your your image off in
into your uh wherever you're doing your
project so you can drag it off into your
depth maps whatever or this image will
be in your temp fold so if we turn this
off to never turn this on always so if
you go to your temp
folder there's your image in your temp
folder and there's your image loaded so
we're doing pretty well now we'll look
at the settings and we'll try everyone
and see what they do here you can use a
mask but I won't go into that I'm going
to deal with masking in a separate video
entirely as a subject by itself because
it's what masking is something that
people find quite difficult I think so
we doing pretty well we got our control
net loaded plumbed in and our map made
and loaded so next we'll look at what
these numbers here do so some of them
are fairly simple strength is obvious
higher the number the stronger the
influence start and end percent is a
little more complicated in the first
video we went through what all these
numbers so in the very first video you
can look at you'll find out what all
these numbers do so if you don't
understand what these numbers do go and
look at the image to image video and
it'll tell you what they are so I can't
go through everything on each video from
the start so I've broken this into
separate video so you can go back and
look at this video and then you'll know
what all these numbers do so we're using
a turbo so we've only got 10 steps so we
have 10 steps so this range here it's
going to start from the very beginning
at the first step and it's going to stop
its influence at the sixth step and so
you can alter that you can start at 5
end 10 you can play around with that and
each of those has a different result so
for this I'm going to turn off the land
Decker so you right click on the Laura
and go bypass and then that Laura won't
make anything any difference at all CU
that one's not working we'll bump the
other Laura up and you need to look at
my video on luras if you want to know
how luras work so we do the prompt and
I've done a video on prompting earlier
so you can go and look at that and
you'll learn something about prompt I'm
going to start by prompt with with a
simple description of what we have so
we'll put the image by The Prompt so
it's a fairy tale Castle we have a lake
or a river what do you think it is I
think it's a lake a still Lake fantasy
illustration is fine we don't have JC
ler anymore we have digital painting
that's the keyword for the Laura and we
have Morning Sun quite soft light and
probably initially that's all we want to
say about it should we say distant Hill
we can take that out of there so nothing
in in the uh in the negative we might
put something we'll put photograph as we
don't want to photograph if you want to
photograph you put photograph in here
obviously so there we go so we need a d
noise we want to change this quite a lot
so we go I think to 65 and there we are
all ready to go we got a fixed seed
seeds was dealt with in the first video
as well so that's it the whole lot is
ready to go so here we are with that
back and there's our image where which
as you see has taken all the color from
this and it's taken the structure from
this which is quite nice one thing I
will warn you is that control Nets are
quite computationally expensive so they
will slow you down if you have a monster
graphics card you'll be fine so this is
being influenced both by the control net
and I didn't go through choosing the
model but you have to choose a depth
model so there's all different models
here there's two depth Ms I think yeah
so there's depth of rank 1 to8 I think
1:8 is slightly less
expensive in Compu in computational time
but uh 256 is better in quality right I
think uh yeah 256 levels of gray and
that's 128 levels of gray I think
that'll be what it is I'm not
certain I guess there but that makes
sense so now we want to see what it does
uh without the influence of this so at
the moment you can see it's very much
taken the color for this but there's no
color information in here so we can turn
it off essentially by taking the D up to
one which means that this image will
have no influence whatsoever and we'll
run that again so here it is back and
here's the difference in the image got
see got a bit of cast in the sky there
so I think you should be able to see
that we still have the same composition
but it doesn't know anything about
what's happening in the background
really hence the hence the funny C
Castle so I'm putting it in at very
strong levels at present so that's uh
that's the result of uh putting things
at at high levels but I think you can
see let's bring the original uh image up
close so you can see we do have a
relationship you can see that this all
follows pretty much the same silhouette
here and we've just got this has all got
prettified I have no idea where that
castle look it really likes putting
Castles in the Sky but I suppose I put
fair I put fairy tale in so I've only
myself to blame so on the next part
we'll look at what canny does which um
makes outlines around things so we'll do
that next and with this you can you can
play with the strength of this against
the strength of this image here so you
can you can with this you control the
strength of this image and with this you
control the strength of the depth map so
you can balance the two together and uh
uh and get a result that you're like you
don't have to put the same image you
made the depth at from in here you could
put a a a mood image in here that was um
entirely different but just had lighting
or colors that you liked but if you just
the less like this image it is the more
the higher the D noise has to be cuz it
has to change it a lot it'll struggle uh
with a a different image and uh loading
noise cuz it won't CU it won't know what
to do so it won't work very well but um
if you use 75 which I did in the last
one and put a an image of of a different
landscape but with nice lighting that
you liked or nice colors then that would
be reflected and you'd get this Castle
lit different which is rather nice okay
so we'll move on to caddy which is quite
a different thing so here we are we're
going to do canny next and as see I've
moved my depth preprocessor over there
and we've got a canny there these will
all be in the workflow so you can stop
them over so we don't want this to run
so we turn to never and that one to
never as well and we just want to
process this image so we got a an image
uh of a lady sitting and it and it's a
bronze so it's quite hard to uh it's
quite hard to put that into image to
image and uh and get a uh you know a
normal colored illustration so run that
and there we have our cany map which is
just a series of lines that it will try
and fit the uh generation so this image
will now be in your temp folder so we
can turn this off turn this on go to
always and if we go to our temp folder
there it is so we've got our image
loaded in and we must change the control
or a model here to canny so you see
canny canny so this model understands
this sort of line work I'm going to uh
use this image as a as a color image but
first we'll run it uh without so
obviously Castle won't do anymore so
we'll say a uh a woman sitting and we'll
put her in a garden cuz we've got uh all
of this uh stuff in in here so we'll put
garden and we'll put Autumn and fantasy
illustration is fine I don't think we
want to still Lake Morning Sun yes
that's good soft light that's good
distant
Hill I will leave the distant Hill why
not so that should all be good and you
see G no is at one so it's at the moment
it's ignoring that image so and the
settings here are the same you know you
have to play with those to uh then
they'll all have different effects so
here we are she's back and there she is
sitting so you can see how it's stuck to
the relationship there we've got
everything we've asked for I think we
got a garden we got Autumn we got the
young lady it's fantasy Morning Sun yes
so now uh we can use this image to to
influence a little so we can lower our
do noise to what should we take it to
we'll take it to 80 so the this and the
prompt so the what what's called the
conditioning essentially is doing 80% of
the heavy lifting and this image is
doing only 20% and we ought to reflect
something about this in the prompt so as
this is a watercolor we might add
watercolor and that and that uh that
should help the influence of that
picture cuz we're using this as a style
image so we'll cue that and here she is
back and you see that this has
influenced the image we still got the
same pose and we' got a waterc fe now if
you want to take that image a little
further I would add another Laura and
this has uh the feel of um Al mut a
little bit so you know it could be so
what we could do is add add an alons so
we'll un bypass our Laura choose alons
Musha alons wants to low level so we
have to put the keyword for the Laura in
so that's the keyword that activates the
Laura okay and I think I think we can
afford um to go to 75 on the doo so this
SC this a little bit more influen and we
leave this the same this is doing pretty
well so we'll cue that and here we go
you see the influence of Al FAL buer and
because I went down to 75 here we've now
got our Castle in that position so we
can now clearly see we've got all of our
inferences going we've got the pose from
this lady we've got I think with a few
iterations you might get a more graceful
pose she's a bit uh she's okay I would
do a few iterations to get a slightly
different POS but um but for this
demonstration I think that shows it it
all works pretty well so this tree has
appeared so our Castle has appeared in
the same position as here all our
lighting and colors are coming from this
and all our pose information and subject
information is coming from here okay
that's it for uh control Nets there are
other control net they all work in
pretty much the same way that's an
animation one I don't know anything
about that open pose uh you get sort of
a stick figure there's a pre-processor
for that there's canny there's depth
there's a recolor one I've never used
that but I assume that's the same thing
there's sketch which is like a crude
form of canny and these are all
different types of control net I only
use canny and depth myself but uh I
occasionally use open pose but um anyway
they all work pretty much the same as's
a pre-processor and uh then you load the
appropriate model okay I hope that was
interesting and helpful thank you very
much
5.0 / 5 (0 votes)


Website Design Process for Clients (Start to Finish)
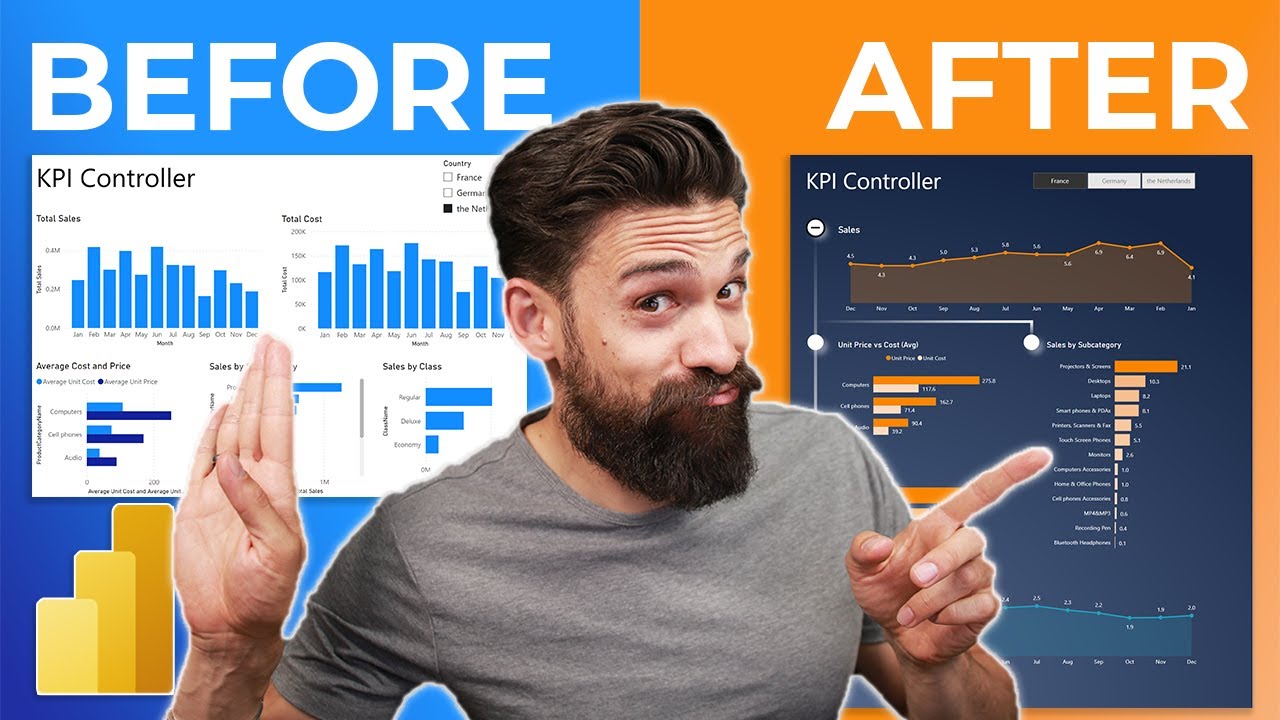
Upgrade Your REPORT DESIGN in Power BI | Complete Walkthrough From A to Z

How to accelerate in Splunk

Risk-Based Alerting (RBA) for Splunk Enterprise Security Explained—Bite-Size Webinar Series (Part 3)
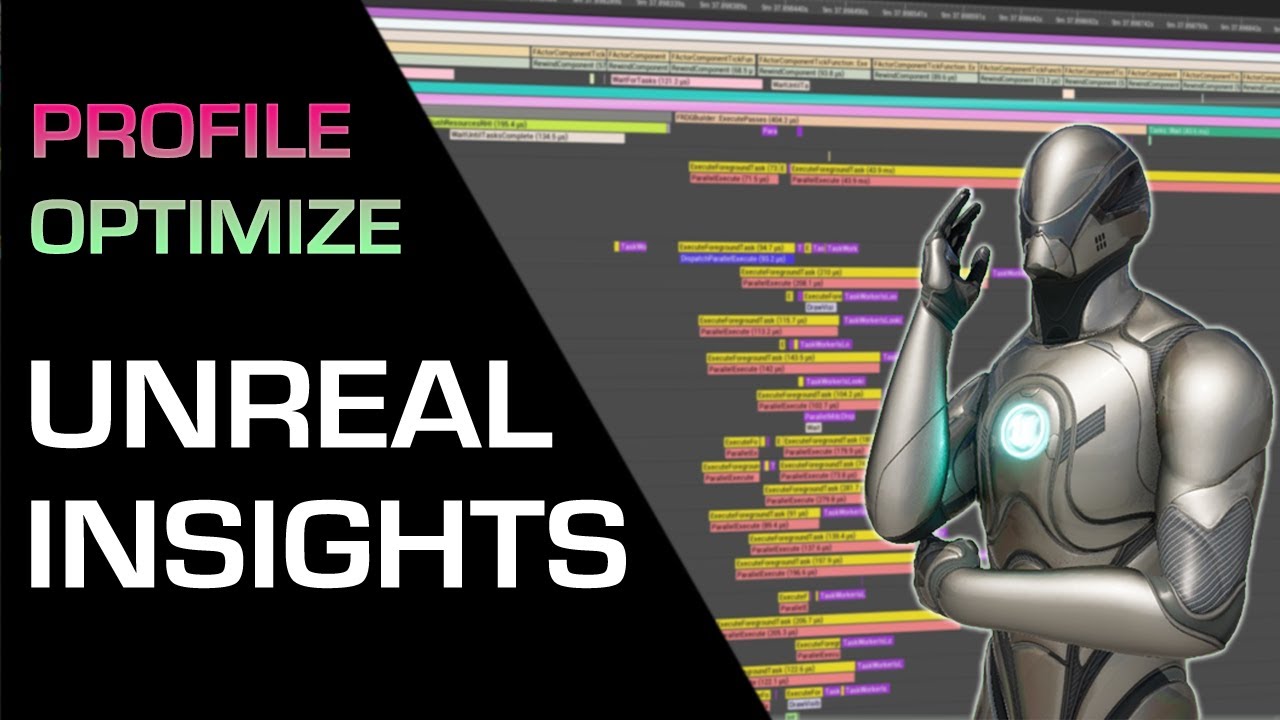
How to Optimize Performance in Unreal Engine 5
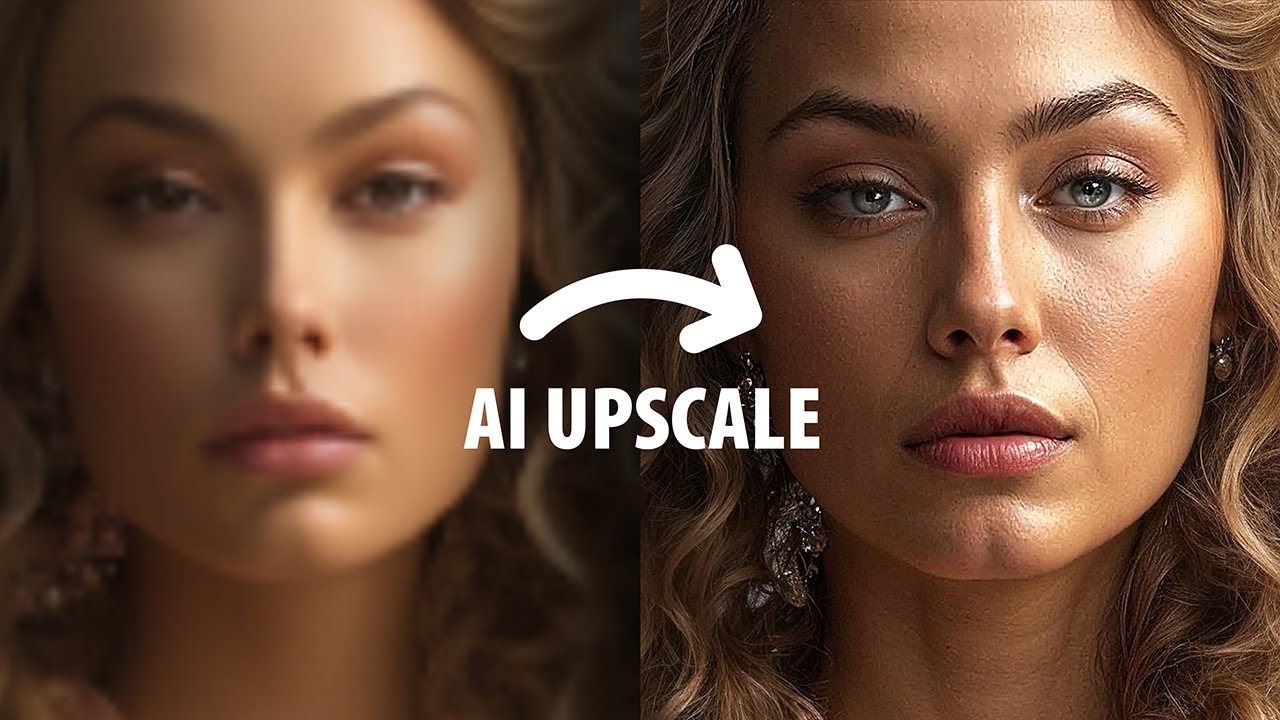
The Most INSANE AI Image Upscaler, EVER!