How to Add Custom GPTs to Instagram DMs (OpenAI GPTs Tutorial)
Summary
TLDR本视频将向您展示如何快速将自定义GPT连接到Instagram,以完全自动化您的DM。通过使用GPT技术,您可以自动化客户支持和潜在客户生成等关键任务。视频提供了一个实时演示,展示了如何设置和避免常见错误。您将学习如何使用OpenAI的API、Repl托管代码、Mini Chat与Instagram集成,并处理潜在客户捕获。视频还提供了详细的步骤和模板,帮助您轻松复制和修改设置,以适应您自己的业务需求。
Takeaways
- 🚀 本视频将展示如何快速将自定义GPT连接到Instagram,实现DMs的自动化。
- 📈 Instagram是一个强大的销售渠道,正确使用可以大幅提升业务。
- 🤖 连接AI助手到Instagram DMs的过程可能会非常复杂,视频提供了简化方法。
- 🔍 视频通过实际演示,展示了如何设置自动化流程。
- 📝 使用了特定的关键词触发自动化,如“测试”,并展示了如何与用户互动。
- 📊 展示了如何通过GPT技术获取用户信息并进行潜在客户捕获。
- 🛠️ 介绍了如何使用OpenAI的API和Repl托管代码来实现自动化。
- 🔗 详细说明了如何设置和修改API密钥,以及如何与Airtable集成。
- 🔄 解释了如何处理Mini Chat的10秒超时问题,以及如何循环检查响应。
- 📌 提供了Mini Chat模板,用户可以根据自己的需求进行调整。
- 📚 强调了视频教程的复杂性,并鼓励观众尝试并应用所学知识。
- 📢 视频最后提供了资源链接,观众可以下载并使用这些资源。
Q & A
视频中提到的最快的连接自定义GPT到Instagram的方法是什么?
-视频提供了一个逐步教程,通过使用Mini Chat和Repl来自动化Instagram的DMs,从而连接GPT。
Instagram作为一个销售渠道有哪些优势?
-Instagram是一个非常强大的销售渠道,当正确使用时,可以通过连接GPT来自动化关键任务,如客户支持和潜在客户生成。
在Instagram DMS中连接AI助手遇到了哪些问题?
-连接AI助手到Instagram DMS的过程可能非常痛苦,视频作者在过去几个月中遇到了持续的问题。
视频中展示的自动化示例是关于什么的?
-视频中的自动化示例是关于如何通过Instagram故事回复触发自动化,然后通过Mini Chat与GPT后端进行交互,以提供个性化的客户支持和潜在客户捕获。
如何通过视频教程创建自己的GPT程序?
-视频提供了一个模板,用户可以复制并按照步骤操作,以创建自己的GPT程序。这包括设置知识库、指令和工具。
在Repl中设置GPT程序需要哪些API密钥?
-需要OpenAI的API密钥来访问GPT模型,以及Airtable的API密钥来处理潜在客户捕获。
如何确保GPT程序能够访问知识库?
-在Repl的设置中,需要上传知识库文档,并确保在创建GPT程序时引用正确的文件名。
视频教程中提到的Mini Chat的10秒超时问题是如何解决的?
-通过将聊天端点分为两个部分:chat endpoint和check endpoint,以及在Mini Chat中设置循环检查,来解决10秒超时问题。
如何将GPT程序部署到Instagram上?
-通过在Mini Chat中设置触发器,如故事回复,然后通过Repl中的API调用与GPT程序交互,实现在Instagram上的自动化对话。
视频教程中提到的AAA加速器计划是什么?
-AAA加速器计划是一个旨在帮助个人在90天内建立盈利且可扩展的AI业务的项目。
Outlines
🚀 自动化Instagram DMs的快速方法
本视频将展示如何快速将自定义GPT连接到Instagram,以自动化DMs。Instagram是一个强大的销售渠道,通过连接GPT,可以自动化客户支持和潜在客户生成等关键任务。视频作者分享了自己过去几个月在连接AI助手到Instagram DMs时遇到的问题,并提供了一种简化的方法。
🛠️ 设置GPT自动化的步骤
视频作者详细介绍了如何设置GPT自动化,包括获取必要的API密钥,设置Airtable API密钥,以及如何在Replit上部署代码。还解释了如何通过修改代码中的特定部分来适应Instagram部署,以及如何处理Mini Chat的10秒超时问题。
🔗 连接Mini Chat并导入模板
视频展示了如何在Mini Chat上设置触发器,创建线程,并使用预设的关键词来启动自动化流程。作者提供了一个Mini Chat模板,用户可以通过简单的URL替换来自定义。同时,解释了如何通过Mini Chat与Replit后端通信,以及如何通过循环来处理超时问题。
📲 在Instagram上测试自动化流程
作者在Instagram上进行了实际测试,展示了如何通过发送特定关键词来触发自动化流程,并实时监控Replit后端的运行状态。测试包括用户输入处理、AI输出生成、以及如何通过Mini Chat与用户进行交互。
📝 捕获潜在客户信息
视频展示了如何通过自动化流程捕获潜在客户的信息,包括姓名和电话号码,并将其记录在Airtable中。作者还提到了如何通过Mini Chat的自动化流程来处理错误,并在必要时将对话转交给人工处理。
🎉 完成教程和后续步骤
视频最后,作者总结了整个教程的复杂性,并鼓励观众尝试自己设置。同时,提供了关于如何将GPT技术应用于网站和Instagram的额外信息,并邀请观众订阅频道以获取更多关于AI解决方案销售的信息。
Mindmap
Keywords
💡GPTs
💡自动化
💡客户支持
💡潜在客户生成
💡直接消息(DMs)
💡Mini Chat
💡Airtable
💡API
💡知识库
💡CRM
Highlights
视频展示了如何将自定义GPT连接到Instagram以自动化DMs(直接消息)
Instagram是一个强大的销售渠道,正确使用可以大幅提升业务
连接AI助手到Instagram DMs可能非常困难,视频提供了一种简化的方法
视频通过实际操作演示了如何设置和避免常见错误
使用特定的关键词可以触发自动化流程
GPT能够根据用户的名字和问题提供个性化的回应
视频展示了如何通过Instagram故事自动回复并触发自动化
介绍了如何使用mini chat和repet后端进行自动化
展示了如何通过模板化代码简化GPT的创建和部署
解释了如何使用OpenAI的API来部署GPT
视频提供了如何通过mini chat模板实现Instagram的GPT部署
介绍了如何通过mini chat进行客户支持和潜在客户生成
展示了如何通过Instagram DMs捕获潜在客户信息并发送到CRM
提供了如何修改和定制GPT的知识库和提示文件
解释了如何设置OpenAI API密钥和Airtable API密钥
视频提供了如何使用mini chat模板进行Instagram自动化的详细步骤
展示了如何通过mini chat处理超过10秒的API请求超时问题
视频最后提供了如何测试和验证Instagram GPT自动化流程
Transcripts
in this video I'll be showing you step
by- step the fastest way to connect your
custom gpts to Instagram to completely
automate your DMs I'm making this video
today because Instagram can be an
incredibly powerful sales Channel when
used right and by connecting your gpts
to Instagram you can completely automate
key tasks like customer support and lead
generation for your business or for your
clients the issue is that connecting AI
assistance to Instagram DMS can be an
extremely painful process and something
that I've had constant issues with over
the past couple of months so I wanted to
create a video to walk you through the
easiest method that I've found so that
you can get things set up and avoid the
mistakes that I've made at this point in
the video I would normally give you a
big explanation of what we're building
but I think it's easier if I just show
you the finished product so we're going
to get a live demo here of exactly what
we're building in this case I'm using
the testing keyword it's going to
trigger the automation that I've set up
within mini chat which you'll see in a
second so in this case I've got some
stories up of me and Dubai if you're not
already following my Instagram it's
going to be available somewhere here you
get to see bit the behind the scenes of
my life and some of the stuff I get to
off camera um but in this case I've got
some stories up and I can reply to it of
testing and it's going to trigger the
Automation and you should see a pop up
at the top there we go so it says Hey
Liam what would you like to know about
the accelerator in this case it's
pulling the first name from my account
so if your name was Sandy or Smith that
would be using that name as the first
name um but because this account name is
Liam it's going to use Liam what would
you like to know about the accelerator
would be happy to help um who is the
owner so we can start asking some
questions in this case it's going to be
taking the question that I send there
it's going to be sending it to mini chat
and then mini chat is going to be
talking to our repet back end which
you're going to see all the code in a
second and I've templated it all so you
can just copy it and follow the steps
I'm about to show you and you'll be able
to get it up and writing so in this case
let come back Thea accelerator program
is Liam mle it's designed to help
individuals establish a profitable and
scalable AI business 90 days is there
any specific information you like to
know about the program um how how much
do the plans
cost
[Music]
the AAA accelerator offers two
membership tiers standard plan which is
$97 monthly Premium plan which is 197
which is currently sold out and so I can
keep asking questions about the program
I can ask it what are all the benefits
what do I get out of it
Etc what are the benefits on the
standard
plan
for
97
what do I
get you get access to over 15 live
workshops a month you get 24 assistant
from aam you get exclusive tools
accountability groups vets Community
templates all the good stuff so what we
can say now is to try initiate the lead
capture if I say I'd like to
join great to here I'll need your full
name and phone number including your
country code to get started so so this
is going for the lead capture now I can
say my name is um
Bruce
Wayne um plus 971 5 2 7 7
8 there we go I can send that
information it's going to pull out the
name and it's going to pull out the
phone number and it's going to send that
off to air table to log that lead so
that our sales team can follow up with
them so that's the that's the build
that's what we're going to be creating
here you can easily modify this by
changing out the knowledge base as
you'll see in the steps that are coming
in a second and you can also change the
CRM from Air table to whatever you want
but you'll be able to take the template
modified as you need and I'll be walking
you through step by step the most
valuable part of this is going to be the
mini chat template that I'm going to
give you which took me like an entire
day to create because there's so much so
many issues that I have with it due to
timeouts and stuff like this which we go
into in a sec we have a ton of stuff to
get through so let's get into it to
achieve the functionality that we just
saw we're going to need of course the
assistance API from open AI we're going
to need a repet to host that code then
we're going to call our rep code from
mini chat and I will mention it again if
you haven't seen any of my other videos
but we have the two sort of sides of
this gpts release which is firstly the
gpts on the chat GPT site where you can
create them and sort of go through them
and use them use them on the browser and
things like this and then we have the
assistance API which is really the the
meat and potatoes and how this thing is
going to be used and rolled out to
businesses and to real world
applications so while gpts are fun and
all and they're cool to create around
and sort of share around with people
most of the value is going to be created
with this assistant API so you can
deploy your gpts and your your setups
essentially to different channels in
this case we're going for an Instagram
deployment and using the GPT technology
for that on my prior videos we've done
website deployment so if you want to
check out how to put these on a website
rather than on Instagram you can do the
exact same process but put it onto a
website watching the video that's up
here I've got a couple of them now but
this is the best one to start with okay
so to get started with this build you
first need to get access to my repet as
always this is going to be available in
the first link in the description you
can go to my resource Hub sign up for
free and it's going to be at the bottom
of the list in the left panel you can
click on it there'll be a link that will
take you to this ret and you should be
greeted with a screen like this first
step is to go to the fork button on the
right we can click Fork here and we can
call it I'm just going to put a fork at
the end and then I can Fork the tripple
give it a second to boot
up then you should be greeted with
something like this for those of you who
don't know how to code don't freak out
you don't need to change any of this
really and there's only a couple parts
that I'll walk you through the process
of and that's mainly around API key so I
build this in a way that it's all ready
to go out of the box I'll just take you
through a bit of a breakdown of how this
is different from some of my other
tutorials and the way that I've had to
modify this so that it works with the
Instagram deployment this actually took
me quite a while to get working because
there's limitations of Min chat which
I'll go into later um but we can start
off where they breakdown of the main. pi
file which is where all the all the
action is happening when we're actually
interacting with this application
similar to the other builds that I've
done firstly we have the SL start
endpoint which is going to start the
conversation whenever we start a
conversation within mini chat a new
person interact with my story they hit
that trigger it's going to call this mpo
the/ start and it's going to create a
new thread we're going to give that
thread back to our mini application so
here we are giving the thread ID back
and then when the user actually asks
their question it's going to be sent to
this chat inpo and that chat inpo is
going to grab the thread ID and the
message then let's go to start a run
what's called a run in the new open AI
documentation and the way that they've
set up the assistant API so you have
what's called a run and in this
particular build we have split the chat
endpoint between this chat one and then
the second one called check now the
reason we've done that is because of the
Timeout on Mini chat is 10 seconds and
when I was testing this before I wasn't
able to get responses on Mini chat
because it was running over that
10-second timeout when I was making the
API Co so we've had to split it into
these two different parts this chat
endpoint is just going to create the run
and sort of send our information and
what we need to do up to the open AI
servers and it's going to be like okay
that's what we want now give us a couple
seconds and we'll wait for it to come
back and the way we actually grab the
response from that endpoint and we've
called the open AI API to give us our
response then we go down to this check
in point we're going to be periodically
checking in to see if our process our
our operation has been completed and if
it has been completed then we can pluck
it out and send it back to the user so
might sound a bit complicated but in
this case it's going to make a lot more
sense when we get into the mini chat
side of thing so bear with me next I'll
take you to the functions. pi file this
is where a lot of the the core
functionality is happening um in this
case we have the lead capture so this is
a air table lead capture we going to be
replacing this URL with a new one um as
you set it up on your end we have API
Keys which we'll be setting up in a
second this is the logic for creating a
new lead in the air table as I mentioned
and this is the create assistant
function which is really the main bit
that you need to wrap your head around
before going out and trying this on your
own so the create assistant function is
because when you're trying to create a
new GPT programmatically in this case
we're not using the GPT Builder we are
creating our own programmatically we
need to give the instructions or the
ingredients to the open AI API to create
our new assistant so in this case we
have of course the knowledge component
which is going to be a document here on
the left called knowledge. dox then we
have the instructions which are going to
be in the prompts dop file which we show
you in a second then we have the
functions which is set up here so I'll
show you how to change each of these
around so that you can modify this so
that you can create your own gpts for
your own use case so in this case we
have the file here which is going to be
the knowledge based document if you want
to change the knowledge base to your own
document you need to delete the
knowledge based document on the left
here and then click upload file here
upload a new file and then you need to
change the name of this file here from
knowledge. do to whatever it is in the
left panel so name here should match the
name of the document on the left hand
panel next if you want to change the
promp thing or the instruction for your
gbt it's going to be stored in this
variable here so the assistent
instructions is imported from our
prompt. piy file which is over on the
left here so if you want to change the
promp thing or the instructions for your
GPT click on the prompt stop High file
on the left I've taken this out because
it doesn't look very clean to have this
massive amount of text sort of stuffed
into your functions of P file so I've
moved it out to here so you can go in
and modify this as you like and any
changes that you make here are going to
be automatically pulled in to this
create assistant function when you
create it to to reiterate we have the
knowledge component here which we can
change we have the prompting component
here which we can change via the prompts
dop file and then finally we have the
tools section uh now the tools and order
to be able to use I should have
mentioned this in some of my other
videos so thank you for those of you who
pointed it out but the model here that
we're calling the GPT 4 preview you
actually need to have a card put on your
open AI account and you need to add some
credit to your account if you haven't
yet done that going to need that which
will show you in a sec but in order to
be able to access this new model which
is able to use GPT the much larger GPT 4
which is faster and and better in a
number of ways we need to do that step
so just to be clear some of you had
issues with that last time that is the
reason why and I'm going to be showing
you in a second how to fix that so when
it comes to tools this is the more
difficult part to change around I will
be completely honest but just to walk
you through it firstly we have the
retrieval tool here this is the
knowledge base as you can see I put a
lot of comments throughout all this
document so if you get stuck you have a
question about something not working or
you want to know how to modify things
take a look at these green comments and
you'll get a much better idea of how
this application is set up so we have
the retrieval tool which is the
knowledge base this needs to be on for
it to be able to access that knowledge
document then secondly we have just one
function here which is the lead capture
the lead capture in this case is using
the create lead function which is up
here it's referencing that name then we
get to the two parameters required to
call this function firstly we have the
name which is obviously the full name of
the lead and then we have the phone
which is the phone number of the lead
including the country code it's
important to know that to operate this
application when you have the three
different ingredients you have your
knowledge base your instructions then
these and then the tooling here as well
when you go to create an assistant when
we run this app up here for the first
time it's going to look on this left
panel and see if there's an assistant.
Json file in this case you can see that
we don't have one so it's going to
follow this and say okay if there is an
assistant. Json file let's load that but
if there is not then let's go through
the creation process and then create a
new file down here so this is our way of
of not duplicating and making a ton of
different assistants when we don't need
it you're going to be charged API usage
by how many assistants that you have up
especially if you're putting a lot of
knowledge in them you get charged by the
the amount of storage that you're taking
out with your documents as well so in
this case it's only going to create a
new assistant when there isn't one
already in the side file and this also
means if you've already run the app once
and you have a assistant. Json file on
the side panel here if you want to
modify the knowledge the prompting or
the tools then you need to delete that
file and then run the app again it will
recreate your assistant. Json file with
a new set of settings okay and with that
orientation out of the way we can get
into modifying the very few parts of the
code that we actually need to change in
order for it to work on your system
firstly we have our open AI API key
pretty straightforward one you can go to
platform. open
a.com then on the left panel here you'll
have an API key section and you can
click here and create a new secret key
it's going to pop up with a a key that
you can copy and you can copy that you
can take it back over to reflet here
then you need to go to the secret
section down the bottom left we can
delete this Google Cloud API key cuz
that's not needed for this one um but in
this case we have open AI API key you
can edit this and then you can paste
yours in and then update the secret and
as I mentioned before in order to make
sure that you get access to these newer
models that we need to make this app run
on the left hand panel here you can
click on settings and then billing you
can add a payment method and then you
can click on this buy credits button and
put 5 to10 in so that you have full
access and permissions to use all of the
latest models next we need to set up our
air table and get our air table API key
so in this case you'll be going to the
resource Hub again which is in the first
link of the description you can sign up
to there and then on the resource Hub
there'll be a link to firstly sign up to
air table if you haven't already and
there'll also be another link for you to
be able to clone my air table base here
so when you click on that link it should
look like this in this case we have
these two tabs here this is just going
to be the accelerator lead is what we're
looking for and you should have this
button up here that says copy base so
when you click that it should clone it
over to your account and look a bit like
this so just to take you through quickly
we have the the names of the leads we
have the phone numbers and we have the
questions and a status so the main ones
that we're going to be dealing with
within this app are the name and the
phone number I'll talk a little bit more
about these questions at the end once
you see it live once you have this base
created we need to get our API Key by
going to the right panel here clicking
on this little uh profile icon then
going to the developer Hub then you'll
be on this page where you can create API
key so you can click create new token
you can call it uh
Instagram lead genin bot you can go to
Scopes and click right and we'll give it
read as well and access you need to
scroll down to your Smith solo CRM and
you can click the create token button
and it should pop up with an API key
that you can copy so you want to copy
that and then head back to repet and in
the same way we just did with the open
AI key you can click on the three dots
to the right of your air table API key
and if you haven't found Secrets it's in
the bottom left here click on that and
this should appear and you can edit
again copy all of this and paste or
delete all of this and put your API key
in inste and update secret and then one
final thing that we need to do is go
back to our air table developers page
and then click on this web API
documentation on the left then you need
to scroll down to the bottom and click
on the Smith solar CRM and then can
click on the accelerator leads table and
then click on create records then you
need to take this URL
here copy all of that from https all the
way to the end of leads copy that head
back to repet and go to the create leads
function in the functions. py file and
then just copy Within delete within the
quotations there and then paste in that
URL so mine's the same so it doesn't
need to change obviously but yours will
have changed a little bit with this
little section here and with all of
those changes made we are ready to run
our application for the first time we
need to click this big green button up
the top and on the left pan panel you'll
see that we'll get our assistant. Json
file created because now it's going to
create an entirely new assistant based
off our settings inside our create
assistant function so the settings we
have here with the knowledge base with
the prompting and the tools it's going
to sort of smoos that all together and
create this assistant. Json file and all
it has in here is this so yours will be
a little bit different but this is what
we're going to be reloading it from so
if I stop it and restart it it's going
to this time read from this file and
pull in that and save that as the
variable in our main function if all has
gone well you should see something
similar to this in the bottom right
corner and you'll also see a web view
that's popped up here saying not found
it's not an issue we can click on this
new tab button in the corner and it's
going to open up a new tab for us here
this is the URL that we're going to be
calling within Min chat to get access
access to all of the functionality that
we have in our main.py file so our start
chat and check endpoints that we can
access by mini chat with that all of and
running correctly now we can get onto
the mini chat side of things I've
created a template for you that you can
just plug and play and change a couple
URLs so if you want to get access to
that again you can sign up with the
first link in the description then you
can get access to the mini chat template
when you click on it it should look like
this when you get on screen if you don't
already have an account for Min chat
you'll need to click on the sign up
button then it allow you to log in with
Facebook and you can go through the
whole setup in this case you want to
click on Instagram and go through the
process this can be a little bit tricky
so I've actually got a a recommended
tutorial from someone else when I had a
bunch of issues with getting this set up
earlier today I walked me through some
of the basic setup for creating a
Facebook page and linking it and the
right way so that it works so there's a
lot of moving Parts when it comes to
your Facebook pages and accounts and
your profiles and all these different
things so I don't want to try and drag
this thing out to be 40 minutes long so
there's like a 3 or four minute tutorial
where the guy explains it really well
that'll be linked down below if you
haven't got an account I'd watch that so
you can set up firstly your Facebook
faceb page and then connect that to your
Instagram account so that everything's
all tied up there then you can come back
here all signed in and ready to go once
you've signed in to mini chat you can
come back to this page and again click
on save to mini chat and it's going to
this time loaded into your account so I
can click on Save flow here for the
account that I've set up view
flow and just like that you have
imported the template that I spent hours
working on today to get working for you
all so this is going to save you a ton
of time I'll walk through it briefly now
and we'll be updating what we need to
along the way to save time starting off
we have a trigger if you're familiar
with these automation platforms you'll
know that triggers are how things start
off in this case we are using a story
reply trigger that I have set up on the
keyword testing I'm actually going to
change this to test two so you know that
I'm actually testing the one that I
built in front of you this is set up to
be listing on all stories when a reply
contains specific words or reaction in
this case the test two word is going to
be what it's looking for if that trigger
is hit then it goes to the first step in
our application which is to create a
thread creating a thread is the first
step in our application and this calls
the Slash so this is creating a new
thread under your assistant that's
essentially the start of a new
conversation or a new bucket of chat
history that we're going to be tracking
the conversation for in this case we can
grab our URL from the repet not found
page copy this head back to mini chat
and we need to replace this URL up to
the start point with our URL so M should
just pop and Fork there make sure you
don't have two for slashes like that so
it should just be your URL and then SL
start if we go through here yeah not
much you need to worry about here we're
saving the thread ID into a custom field
code thread ID don't touch any of this
here just leave it with all the numbers
included by this point we've created a
thread and now we can say hey first name
what would you like to know about the
accelerator I'd be happy to help and
then we are going to be listening for a
response so this is a a free keyboard
input so it's just waiting for them to
send something through what we're doing
is saving that to the variable called
last reply which is what we're going to
send off to our next endpoint in order
to start the process of generating a
result so we send that off to this first
step which is just a clear AI output
field just to make sure that the
variable is empty don't need to worry
about that too much the key point is
that after that we go to the start run
step now here we are doing the same
thing with the URL again you need to
paste in your URL and have the entire
URL and then slash chat this time so
again first one will start this time
it's chat next one will be check and
these will correspond to the different
endpoints that we've set up in our
application so they start creates a new
thread starts the conversation the chat
endpoint starts the Run sends off the
information to openai to start
processing the answer and then the final
one which we're about to see in a second
is what checks it and Returns the answer
so going back to Min chat you can leave
these as they are but just to give you
an idea we are sending away to our chat
endpoint to start the processing the
thread ID and the message from the user
which we are getting from earlier where
we created the thread ID we've saved
that and we're referencing it here and
the message which we are pulling from
the last reply that we just got from the
user we're sending that off and what
this returns to us is a run run ID now
this run ID is what we need to be able
to check the status of the sort of order
that we've sent off to open AI now that
we have created the thread we've got the
users input we've sent that off and said
can you work on this for us now we can
periodically check back in to see the
status of that response and we do that
via our run ID run ID is already set up
here and then we pass that run ID to our
final endpoint which is of course the
check endpoint which is checking the
status of the Run make sure you have
your url here/ check in the body of this
request we sending away the thread ID
and the Run ID to check the status of
that run and the response that we should
be getting back here is the answer to
the user's question so this is the final
output that we do present to the user
and send within the Instagram DMS and
this part here is probably the most
difficult but to understand but this is
how we are allowing it to Loop through
as I mentioned before mini chat has a
10c uh cut off a Timeout on the API
request so the issue I was having here
is that when I was trying to create this
earlier today I kept running into this
issue of it would answer the shorter
questions but then whenever I asked for
a longer response it would just
completely blank and wouldn't send
anything and after a lot of searching
around I eventually figured out that
there is a 10 second Timeout on this and
unfortunately a lot of the stuff that we
do particularly with function calling
and and knowledge bases can take longer
than 10 seconds to get back to us the
way that we get around this timeout is
this conditional block here in which if
the check end point returns timeout then
we're going to loop back around and try
it again so if you look back at our code
we have this check Endo here and it has
a timer of 9 seconds so it's going to
check the status of the run over and
over and over again which you'll see in
the bottom right here in a second it's
going to be printing out run and
progress run and progress run in
progress run in progress and then when
it's complete it's going to send it off
but if the run is still in progress and
by the time it gets to the end of that 9
seconds it's going to send back a
timeout and say hey look we've run out
of time then we're going to try it again
and check how much longer so this will
make more sense when you see it in
action in a second but it does work and
I'm very happy that I was able to get
this working for you all and then we
have an error handling step where if the
AI outputs some kind of error we're just
going to assign it to a human to to
handle the conversation and the final
part of this conditional check is that
if there isn't a timer as in we don't
have to keep waiting for a response and
there isn't an error then we can go down
and send the final AI output that we get
back from the check inpoint and we can
send it to the user and await their next
input this final step here is printing
out the AI output and we're also at the
same time expecting input from them and
saving it to last reply and with that
last reply we can Loop right back up to
here and then go through the whole
process again I'm saying okay now we
have a new user input let's firstly send
it off to the chat endpoint get that
cooking away and the open a servers then
we can check into it over and over and
over again until it comes back as a
complete response I think that's enough
talking we are ready to get this thing
tested I just want to do one final check
and you guys should all make sure you do
this that we have updated the URLs for
all of them so Instagram accelerator ass
for/ start yep that's correct go here
slash chat yep that's the second one and
then SL check yep we are all good to go
here now I can click the update button
here and I'm ready to give it a test on
the phone we're on the phone here and I
can pull up my story and I can say test
to send that we should get an automated
message any second yep there we go hey
Liam what would you like to know about
the accelerator would be happy to help
um what coaching do you
offer now I do want to pull up on the
other side the repet back end so so it's
handy to watch it as I send this we
should see things pop up like it start
to thread checking for status and
progress and progress and progress so
you can see the debug here the way that
I've set it up it's going to be printing
out and giving you updates very
constantly on how things
up oh there we go you can see here in
the console that it's been checking for
the status of the run and it's been in
progress and progress and progress and
when it gets to the end of that 9-second
period it goes okay I need to send a
timeout response and then we need to try
loop back again and continue to check in
this case it's timed out once then it
started the next Loop and then
immediately found that the response was
ready and then we sent it in this case
we have it on our phone here
personalized assistance regular one-on
ones exclusive resources Etc Great and
then we can try to get a lead capture
going here so I'm ready to
start and again watching the console
here in progress in progress in
progress completed and boom it sends it
through now we need a full name and
phone uh um P to
Parker like a
jacket and that should ask for my phone
number as well sure I'll give you my
phone
number now it should go for a lead
capture here requir action action and
process lead created success F checking
run status and progress and
progress completed and it sends it back
and now we should pull up our air table
here we should have Peter Parker there
we go we've got two of them and that's
the builds we can continue to ask
questions here and going through and
learning more about the product but we
have done the lead capture I think it
will allow us to do another lead capture
even but in this case we've gotten what
we wanted out of it they've been able to
ask questions make a decision and we've
captured the lead that we can send to
the sales team and they can follow up on
there is this column here of question
that I was going to include but it made
it a little bit more complex and I think
many chat has already made this as
complex as it needs to be but this
questions column was intended to be a an
additional field for the lead capture
function which can pull out of the
thread out of the transcript of the
conversation it can pull some of the
questions that the user ask and add them
to this field when you capture the lead
so that the sales person can look at the
questions column and go okay this person
was worried about price or this person
was worried about the features or or the
team Etc that's not something I've
included in this build but it is
possible if you guys want me to make a
video breaking down how you can get all
of the transcripts from your assistants
from say your Instagram deployment from
your website deployments anywhere you
want it we can be pulling those and
centralizing them somewhere so if you
want me to do a video on it I have had
some requests already but please let me
know in the comments below and I'll I'll
make sure I get that out as soon as
possible as I mentioned in my last video
there's repet application is not
properly deployed it's not production
grade and production read this just
allows you to spin it up and see how it
works quickly if you do want me to do a
video breaking down how you can actually
do a live production grade deployment of
one of these applications using repet or
other ser Services also let me know in
the comments because I can make that
video too if you've got this far
congratulations this is definitely one
of the tougher tutorials I've done and
there's definitely a lot more complexity
that I've had to to work into this to
get it working on Instagram which is
just really the nature of the platform
right now so I hope You' been able to
follow along and get as much out of this
as possible if you have enjoyed please
hit down below and leave a like I put a
timeon of work into this thing it's
actually been delayed a bit just by the
amount of issues that I've had with
trying to get a way that works for you
guys as easy as possible so I'm sure
many of you going to take this and be
able to do some awesome stuff with it um
I hope the use case is a little bit
different from the solar one that I've
I've talked about a lot I wanted to show
you how this can be used for more
educational products or coaching offers
and things like this and not only handle
questions and sort of customer support
but also go for lead capture and things
like this to create a lead generation
chatbot on Instagram using your GPT
technology and of course while you're
down there you can subscribe to the
channel if you haven't already this is
kind of all we talk about on the channel
AI business how to sell AI solution so
if you want to stay in the loop on how
I'm attacking this gpts opportunity and
how you can best take advantage but to
make your business better or to sell
better things to your clients be sure to
subscribe to the channel because I have
a ton of really cool stuff coming I have
a sort of Mastery GPT development guide
that takes you through all of this and
Beyond just a little tutorial like this
it's really a comprehensive look at how
you can Master building these things so
that you can really unlock the value of
this new technology if you don't want to
miss that and any other future uploads
you can subscribe down below but if you
want to learn how to create your own AI
automation agency and Sell Solutions
just like this to businesses then you
can join the biggest community of AI
agency owners in the world who are
already moving on this opportunity you
can also join my free telegram down
below if you want daily updates on my
learnings and the things that I'm doing
with these gpts and how I'm selling them
as well as always all of the resources
mentioned in this video will be
available on my resource hub for you to
download and steal and build and sell
and do whatever you want to do with if
you enjoyed this video and also want to
know how you can put your gpts on
websites you can check out this video
here where I go to depth on it but aside
from that thank you so much for watching
and I'll see you in the next one
4.8 / 5 (49 votes)

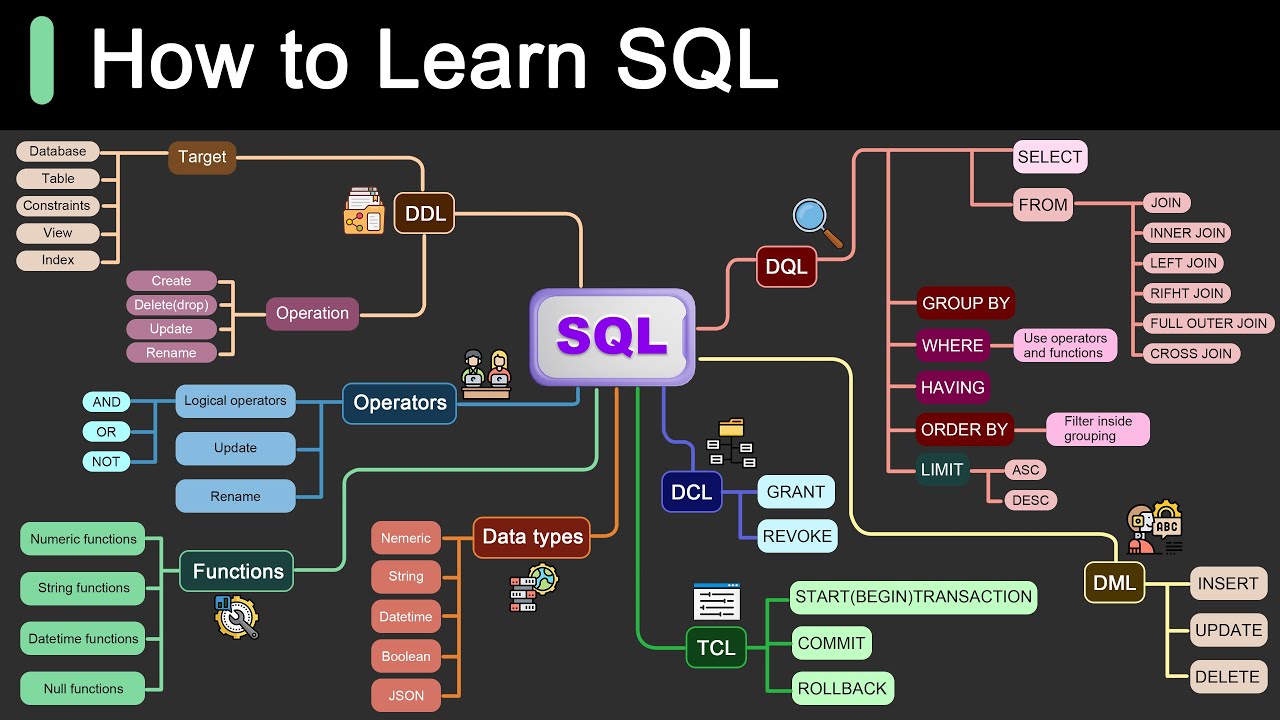
Roadmap for Learning SQL
6款工具帮你自动赚钱,轻松上手帮你打开全新的收入渠道,赚钱效率高出100倍,用好这几款AI人工智能工具,你会发现赚钱从来没如此简单过
【保姆级+免费】GPT4自动化神器:一键生成文案、视频、编程,小白也能轻松掌握AgentAI!
Website Design Process for Clients (Start to Finish)
Upgrade Your REPORT DESIGN in Power BI | Complete Walkthrough From A to Z

Beginner's Guide to ControlNets in ComfyUI