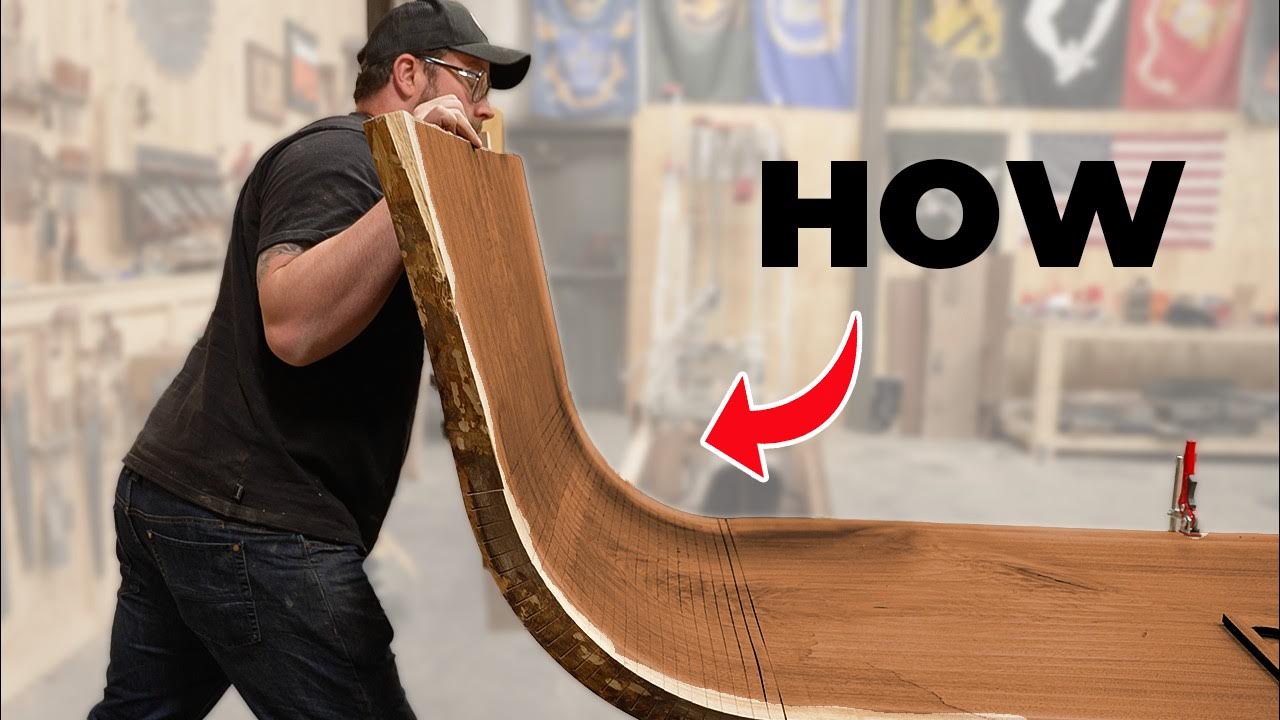
I Tested Viral Folding Furniture
Summary
TLDRThe video follows a woodworker's journey as he tackles two challenging folding furniture projects: a viral wall desk and a cabinet with a unique folding door. The creator shares his process, from initial plans and material selection to the intricate assembly and problem-solving. Despite facing precision challenges and minor setbacks, he perseveres, offering insights into design adaptations and the satisfaction of bringing complex projects to life.
Takeaways
- 📚 The video features two folding furniture projects: a desk and a cabinet with a unique folding door.
- 🔨 The desk project gained significant online popularity and has been highly requested by viewers.
- 🌟 The folding door cabinet has been a viral internet sensation for years, inspiring the creator's rendition.
- 🛠️ The desk's construction is more complex than it appears, requiring precise measurements and components.
- 🪵 The creator uses maple leftover from a previous project for the desk's base due to its appealing light wood color.
- 📐 The folding door mechanism involves intricate joinery and must be carefully executed to function properly.
- 🎥 The video includes a giveaway for viewers to win the finished table, with details provided in the video description.
- 🔧 The creator faces challenges with accuracy and alignment throughout the build, making adjustments as necessary.
- 💡 The creator is inspired by other woodworkers' videos and incorporates elements from various sources into the projects.
- 🎉 The projects involve a mix of modern and traditional woodworking techniques, showcasing the creator's adaptability.
- 🏆 Despite the difficulties and learning curves, the creator successfully completes both projects, demonstrating perseverance and skill.
Q & A
What are the two folding projects discussed in the video?
-The two folding projects discussed are a desk that has gained popularity on the internet and a folding door for a cabinet, specifically a window box door.
What type of wood is the woodworker planning to use for the desk project?
-The woodworker plans to use maple for the desk project because they have leftover maple from a previous project.
What is the approximate size of the desk panel?
-The desk panel is approximately 40.5 inches by 21.5 inches.
How does the woodworker plan to address the complexity of the desk project?
-The woodworker plans to start by gluing up the base and carefully assembling the many moving parts, taking extra care to avoid mistakes that could lead to a catastrophic failure of the project.
What is the woodworker's strategy for cutting the precise measurements needed for the desk project?
-The woodworker plans to cut the parts, mark them with double-sided tape, and then cut the exact mirroring sides for all the notches on the table saw.
What is the purpose of the snack depot cabinet with the folding door?
-The purpose of the snack depot cabinet is to store snacks in a creative and space-saving way, with the folding door adding an element of novelty and convenience.
What material is suggested for the door of the snack depot cabinet?
-The woodworker suggests using glass or plexiglass for the door of the snack depot cabinet to allow visibility and potentially backlight with LEDs.
How does the woodworker plan to reinforce the corners of the cabinet after gluing?
-The woodworker plans to reinforce the corners with splines that match the door, which will be made out of Walnut.
What is the woodworker's approach to cutting the precise lines for the grid on the band saw?
-The woodworker plans to trace the lines, set the fence on the band saw, and make stop cuts for each line, ensuring clarity of vision for precision.
What issue does the woodworker encounter with the initial glue up of the desk panel?
-The woodworker encounters an issue with the initial glue up of the desk panel due to a lack of proper pressure from the picture frame clamps, leading to a longer than expected gluing time and potential misalignment.
Outlines
🛠️ Introducing Folding Furniture Projects
The video begins with the woodworker expressing excitement about tackling folding furniture projects, an area they have not previously explored. The focus is on two internet-famous projects: a desk that has gained significant attention and a folding door cabinet. The woodworker discusses the complexity of the desk design, requiring a pole mechanism for support, and shares concerns about the precision needed for a successful build. The first steps involve gluing the base and selecting light wood and maple for materials. A giveaway is mentioned, offering a chance to win the finished table. The video then transitions to planning the folding door, discussing variations and design considerations, including the use of glass or plexiglass and backlighting with LEDs. The woodworker commits to building a snack depot with the door and shares the initial steps of milling materials for the cabinet box.
📐 Precise Measurements and Panel Gluing
The paragraph details the woodworker's meticulous approach to cutting and gluing panels for the desk project. The focus is on achieving precise measurements and a clean glue-up for the panels. The woodworker discusses the challenges of working with a 40.5-inch by 21.5-inch panel and the need for careful planning to ensure stability. The process involves cutting parts, gluing them together, and allowing them to dry. The woodworker also shares their strategy for cutting precise lines on the panels, using a bandsaw and taking measures to protect their eyes with shop shades. The paragraph ends with the woodworker cutting out a grid pattern on the band saw and chiseling the edges for a precise fit.
🔨 Tabletop Assembly and Slot Creation
This section of the video script covers the assembly of the tabletop and the creation of numerous slots required for the folding mechanism. The woodworker describes the process of drying, cleaning, and cutting the edges of the glued panels. They discuss the challenges of making precise measurements and the techniques used to cut the slots, including using a router and dealing with dull bits. The woodworker expresses satisfaction with the progress of the tabletop, despite some imperfections that will be hidden in the final product. The paragraph concludes with the woodworker planning the next steps for the door project, including milling down stock and creating strips for the door's design.
🎨 Customizing the Folding Door Mechanism
The woodworker delves into the intricacies of building the folding door mechanism, discussing the design process and the materials chosen. They express concerns about the appearance of the initial design, deciding to use walnut for the door strips and considering the addition of a shelf. The focus is on creating a precise and intricately designed door with triangular sections that pivot when opened. The woodworker shares their thought process and the steps taken to ensure the door's functionality, including creating lap joints and ensuring the door's alignment. They also discuss the challenges of building the project and the adjustments made to the design based on the original plans found online.
🔧 Hinge Installation and Adjustment
In this part of the video script, the woodworker tackles the installation of hinges for the folding door project. They express concerns about the alignment and squareness of the door components, which are crucial for the door's functionality. The process involves marking and drilling holes for the hinges, as well as adjusting the gaps between the door parts for a smooth operation. The woodworker also discusses the addition of a handle and the need to ensure that it operates smoothly. They share their excitement about the progress of the project and the anticipation of completing the folding door mechanism.
🛠️ Finalizing the Folding Door and Cabinet
The woodworker continues to work on the folding door mechanism, discussing the need for adjustments and refinements. They address issues with the door's alignment and the need for additional support to ensure smooth operation. The focus is on finding solutions to the challenges encountered, such as using clamps and CA glue to fix broken parts and re-cutting parts for a better fit. The woodworker also shares their excitement about the arrival of shop shades and thanks their supporters. They discuss the final steps for the cabinet, including installing the door and adding a back panel made of Plexiglas. The paragraph ends with the woodworker sanding and polishing the edges of the Plexiglas and preparing for the final assembly of the cabinet.
Mindmap
Keywords
💡woodworking
💡folding furniture
💡desk
💡folding door
💡cabinet
💡joinery
💡router
💡hinges
💡glass
💡sanding
💡spline
Highlights
The woodworker's excitement for building folding furniture, especially a desk that went viral on the internet.
The complexity of the desk design, requiring a pole inside for it to pull off the wall properly.
The use of maple leftover from a previous project for the desk's base, showing resourcefulness in wood selection.
The detailed process of gluing up the base and the various moving parts involved in the desk's construction.
The giveaway opportunity for viewers to win the table being built, adding an interactive element to the woodworking process.
The decision to cut the desk panel in half and then glue it back together for stability and ease of construction.
The introduction of the second project, a folding cabinet with a unique door design, showcasing versatility in woodworking.
The design process of the folding door involving precise measurements and the use of computer drawings.
The challenge of cutting precise lines on the desk panel and the solution of tracing and using a band saw for intricate cuts.
The importance of safety and comfort in the shop, highlighted by the recommendation of clear vision protective eyewear.
The meticulous process of assembling and ensuring the squareness of the cabinet box for the folding door.
The innovative idea of using glass or plexiglass for the door of the cabinet, with the potential for backlighting and a French cleat mounting system.
The problem-solving approach to the door's pivot mechanism, involving the use of Walnut and the creation of a lap joint.
The time-consuming and detailed effort put into the desk's construction, emphasizing the patience and dedication required in woodworking.
The final assembly and testing of the folding desk, demonstrating the culmination of careful planning and execution in a woodworking project.
Transcripts
how the am I going to build this at some
point I think every woodworker wants to
try and build folding furniture and I've
never really done any so I super stoked
for this video we've got two folding
projects today that I'm going to try
first one being this desk that went
absolutely bananas on the internet with
tens of millions of views Chris and Joe
love this thing and they've been begging
me to build it for months so we're going
to crush this thing out first then we're
going to dive in to the folding door
that has been taking over the Internet
for years specifically this little
cabinet that has this awesome little
folder I think I can do a really cool
rendition of it let's dive right into
the first project so as I look at it
this desk is a lot more complicated than
it looks in order to get that thing to
kind of pull off the wall you've got to
have a pole or something going across
inside of it there is a video out there
that shows how it's built so I think we
can get this done we've got to do a glue
up of the base first that's going to be
the actual desktop I like the light wood
color and uh I have a bunch of maple
left over from when we built this this
bench so I think we're going to dive in
Mill up some wood and then I'll get the
entire base kind of glued up and all the
parts that are going to go into it
there's a lot of moving Parts here and I
am definitely afraid that if I screw up
one the whole thing could go
catastrophically wrong so let's give it
a try so let me move this out of the way
first and foremost because we haven't
given it away yet if you didn't know you
can win this table and take it home with
you right now all the information you
need is linked down below pretty awesome
giveaway we're running right now on the
website so I think to make this
efficient I want to pick my parts rough
cut them and then I'll just go through
like standard Joiner and planer
situation on this little diagram that
Chris came up with we're looking at a 40
1/2 in by 21 and 1/2 in panel I don't
know how he thinks I'm going to be able
to do this stuff got to love the
computer drawings so we're going to cut
enough Parts give me a glue up that's
going to be stable wideboard I think I
can fix it after if it's
broken do a little glue panel glue up
here keep these out of the way so I can
get working on all the rails I'm going
to do these in two parts just because of
the width of them I don't want them to
Bow I'm actually going to let these uh
set and then I'll come back later today
and I'll glue them together hopefully
stays nice and flat always going to be
concerned when you're gluing up a
panel that's wider than it is long or
whatever you know usually you go the
other way but for the sake of what we're
trying to do here and that look with the
rails on the wall this is the way we got
to do it
let's go gam plan on these strips all of
these are a 1 in thickness which isn't a
problem but we're ranging from 39 to 24
and then there's a bunch of just random
numbers in between I think that'll be
easier to cut after we're kind of
assembled so we just need one kind of
square side material y these are all one
and a got to love that 1 and
516 why oh well all right let's cut some
strips
so while the panel's dry we're going to
dive into project number two because I
need to cut the base for the desk before
I can start doing any of the joinery cuz
a lot of the joints are predicated on
the distance off of where it's going to
land on the base so let's dive into that
so while I'm looking at the folding
cabinet window box door thing there's a
bunch of different variations on how
this can work my buddy Johnny Lambert
Over Johnny builds has done some very VI
versions of this that are like full
scale there's also a ton of videos out
there I really like how simple this one
is and I think it'd be really cool to
put all of our snacks in there's a ton
of YouTubers out there making awesome
and delicious snacks and the guys say I
don't provide them with enough snacks so
we're going to build a snack Depot using
this cool door here we've got a pretty
cool design that we've come up with
Chris actually dove into like the
nuances of how these doors work so we've
got all of that kind of prepared here
first thing I need to do is build a box
for the cabinet and Mill up all the
parts that are going then go into the
door I think I'm going to do glass or
plexiglass on the door so we can see
into it maybe back light some LEDs
French cleat I am a French get crazy
with it I don't know I might even throw
a dovetail in there for shits and
giggles who knows but first I do need to
Mill down some materials and then get
that box glued
up the question becomes shelf does Joe
want a
shelf no Joe just wants me to move the
project
forward that is what we're looking for
butthole tight fit we'll get some clamps
glue on this clamps and then tomorrow
I'll reinforce all these Corners with
splines that are going to match the door
which we're also we're going to make out
of Walnut well we put a shelf in cuz the
the door is essentially two parts and
it'll go down the middle and we have two
essentially 15in boxes here so this glue
up should go pretty smooth and by that I
mean probably terrible all right do it
for these like inside Corners cuz
they're kind of a pain in the ass we're
just going to throw a piece of tape
across all of them help with that clean
up the squeeze out we're trying to be
quick here so I don't want to have to do
a ton of work on the inside of the box
once we're ready to rock and roll cuz I
feel like I'm going to be spending a
shitload of time trying to get the door
to
work said you think I'd learned my
lesson with these pieces of I keep
going back to them cuz they're fast but
God do they suck
approximately 10 hours later all right
so while the box is drying we're going
to hop back to these panels now
initially I wanted to have my full desk
panel glued up but after looking again
at the drawing Chris made based on the
Tik Tok it's going to be a lot easier if
I just cut this sucker in half and then
tape my panels together and make these
Cuts one time to get all these separate
spacings then I can flip it and glue it
back together instead of having to do it
on both sides so I'm going to clean
these the glue off of these and then
we're going to get these cut down to
size on the table saw kind of show you
how I think I can maybe do
this so this is going to be the panel of
our desk and I think it'll be easier if
I cut all these parts but there's all
those measurements that need cut so
instead of doing it in one piece what
I'm going to do is just throw some
double-sided tape on it which should
allow me to fairly easily cut the exact
same mirroring sides for all those
notches that need to go into this sucker
which you uh don't get to see on camera
for this part is the probably like
multiple hours that Chris had to put in
in Fusion to get this thing to work
there was metric measurements on the
video itself but I'm not a European I'm
an American so Chris actually put it
into a model and got the thing like kind
of functioning and working if I want to
do this correctly I'll start out by
marking what it says here so it'd be
nice if it was one measurement so this
is 3 and 70 7/8 2 and 3 16 2 and 76 13
16 and 2 and 7 16 1 and
5/8 and then I think every Gap is going
to be an inch and A4 or one 516 and this
part sucks this is the most precise
measure drink I think I've ever done on
anything how the hell am I going to do
that H cuz I'm a hack the easiest way
for me to do this is to just Trace these
lines all the way up find this the lines
on both sides set the fence make a stop
cut onto the next one kind of thing and
cut the grid out on the band saw now I
think I can cut the grid out something
vitally important when you're cutting
like precise lines like this you need
Crystal Clear Vision which is why you
got to grab yourself some shop Shades
these things the clearest and most
comfortable I wear you're ever going to
wear in the shop and don't take my word
for it Joe the guy on the camera he's
wearing them all day long too he put the
camera down just to show you all day
Comfort I never take them off I'm always
wearing them Andy's nervous now let's
make some precise
Cuts now this is where things could get
squirly I've got a few options here I
could trace these around which is what
I'm going to try to do and then I'm
going to see if I can go back over to
the band saw and flip the board over
because I ran out of fence and throat
and uh I'll try them that way and if
that doesn't work I'm gonna have to do
these by hand which I'm not looking
forward to I was like how far do I go oh
there's a line there Jag ass these
aren't that bad I'm going to just try
this that wasn't too bad the worry is
that I'm not straight but that doesn't
look bad okay Mark the next one the dude
who built this built this in his
apartment so like if I can't do do this
in a full wood shop I'm a schmuck I
guess we already know I'm a schmuck
but the dude did it in tongs and it is
apartment like got absolute
G I think I got offline on that one I'll
fix it in post these are getting
tight yeah we're going to Chisel it
we're good in sharp
here and grain maple exactly what you
want to be chiseling it's not
nerve-wracking or difficult at all that
tight angle too really no
pressure I'm pretty happy with how this
thing's looking I guess now we can uh
layer out see what we're going to look
like here oh so satisfying just don't
snap
damn
bastard was stuck so there is our
tabletop solid let glue it up so this
will set up in a couple hours I can
start working on all the slots cuz
there's a butt ton of them so we're dry
enough that I'm going to start messing
with this I do need to clean up this
edge here because like I when I in my
cut I was a little slightly off made a
few marks on this side yeah and I should
just be easily able to to get that
the entire Mort or is that a mortise
slot whatever we want to call it with a
smaller bit so then I can come over here
and finish it with a 38 bit a little bit
nerve-wracking I wish I could just do
the holes like the guy did but I'm
getting terrible results because my
router and for multitude of issues these
two just get holes the rest of them I've
got to Mark the center line on all of
them and then I'm going to drill out all
of the holes where everything's going to
land and then we'll uh cut some
slots oh sweet Mother of God the last
one these were such a pain in the ass
the bit got dull like 3/4 of the way
through started having ridiculous tear
out so I had to start taking less and
less passes which means like some of
them I was doing like four or five
passes on just to get the pocket to cut
they don't look great but thank God
they're going to be hidden that sucked I
don't know how this dude did it on the
floor of his apartment and just made it
look so damn Flawless cuz that was like
three straight hours of just Milling ho
this glue up did not go to plan one I'm
out of practice cuz I built and
not real woodworking anymore I think
because I had that Center divider in
there usually everything will come
together and those picture frame clamps
just were not adding enough pressure
took us a minute but I got I got her
glued up so let's see how I did took me
like 40 minutes to glue this thing up
when it should have taken me five we're
looking pretty solid yeah we'll give it
a quick sanding and then um make sure
it's
Square we're really damn close to square
looking at the drawing now see I'm wild
crisk off this what the is
this we got 3/4 in stock so that's going
to be the probably the first thing that
I need to do is Mill down a bunch of 3/4
in stock because the way this is going
to work is I will more or less band the
door with triangles so this will have a
triangle and then this one will be a
nipped triangle that'll have another
smaller triangle here and when I open it
it'll pivot from these two corners so
we'll have to figure that out I think we
just need to go get some Walnut Mill it
down to 3/4 and rip ourselves some
strips and then I'll start roughing out
parts and seeing how I'm going to put
this thing together I think just by the
way Chris designed it I should be able
to use pinned techniques it'll make
sense here in a minute I got to get over
the fact that this is going to look
stupid you can't fix stupid I have to
build the first triangle like this for
both of these sides in my head I'm like
the best way to do this is going to be a
lap joint on all the corners here's part
that sucks how the am I going to build
this I'll do it on the table saw I just
won't use a do St then we're going to be
good and I'll clean them all up by hand
first part I'm going to work on is these
two triangles create two mirrors where
essentially I could take this cut that
part out and then do the same thing on
this guy and it'll be one setup I'll be
able to do the four parts that need this
so the cross member will get tricky but
I can do the same thing I can make the
Mark I can use the gauge on the base on
the table saw angle it cut my
establishing shoulder come back through
Mark I don't have any opport opportunity
to explain what I'm doing so I'm just
going to do
it and so these joints need cleaning the
pivot point for this door will go
through there which will help lock it in
so next I need to figure out how the
hell I'm going to do the cross bark
Chris made it pretty clear that in order
for these to work properly they have to
be exactly square at least the way he
designed it up obviously I'm just going
to do whatever I want I'm going to try
to follow his guidelines it is new hats
baby grab one you can also get entered
to win the giveaway that we're still
running on the table I built in my last
video if you want to take that home
check out our new hat or anything else
on the website so that at the moment is
my plan you probably ask yourself why
didn't you put a domino in like I got to
do a domino there but I can't do a
domino here be super short to make sure
that I'm super precise I'm going to
clean up my joints
first all right so I could
destroy and ruin everything at this
moment that I've worked so hard for the
last 45 minutes to lay out the only way
to see if I'm going to do that though is
to grow a set and send it so I will say
I need to transfer a few marks cuz I
didn't transfer my edges just to make
sure when everything lines up and
they're 45° angles Chris just pointed
out so they're not terrible to add even
more anxiety to this I just realized cuz
I forgot that I can't cut all of them
from the same side so what I'm going to
need to do is cut four of the cuts on
this side and then four of the cuts on
the other side um which means I'm going
to have to adjust the blade which could
lead to to micro issues and yay this is
going great I'm so
happy all right not too shabby so far
everything's kind of long and loose
still but boom clean those up a bit and
then I will have two triangles and it
only took me 2 hours do you have to do
more those are going to be even more fun
here we go these are our two door parts
so I'll get these and I'll get these
glued up and then I'll bring bring them
down to like final size I'll start now
I'm going to start working on this other
which is going to be these
really freaking weird looking bat
somehow I got to do that in the real
world it's going to be great it's his
fault in order to make the little Gap in
the triangle on the next one I'm going
to start there I have to cut the angle
which is 22 1/2 so I took that
measurement I set the angle here I have
to cut this with an outside width of
four and 1516 in and then make two of
them it's fun is that right that can't
be right let's see 11 and a half I can't
talk I don't know what I'm
doing now we got to do these little I'm
going to do a domino in here I think I
have super super small ones a little bit
of TLC should be looking pretty good for
the glue up sake like not shabby not too
shabby at all this actually look really
nice thanks man thanks I try hard you
can't have it I don't want it I was just
like yeah you do Joe was just professing
off camera how much he wants it I never
said
that okay so I'm going to use CA glue to
clamp this which will just help me get
the Domino in and then I will use a
little dab of CA to hold everything kind
of tight that'll hold it while I get a
I'll get the strap around it once I have
the lap joints glued up cuz those get
glued vertically which is a little bit
more uh surface area and an easier thing
to glue
up it's definitely a hack like you
definitely want to come back can
reinforce
that so everything should be dry and
ready to get fitted this has been quite
a little adventured here I feel like
I've gotten nothing done cuz it's all so
small and tedious we should start making
some heavy Headway now that I have
triangles built so I still need to build
the last two pieces I'll get these
squared and shaped up and then I'll get
into it touch these up with a sander and
then like there we go that little piece
there it's looking cool now let's finish
the damn desk now we get to drill all
the hinges in woo so they need to be
facing us so that way this piece can go
like
this make sense makes no sense to me I'm
very scared 30 hinges this sucks this is
not what I like to do I just really hope
these Rinky Dink little Chinese screws
work teamwork like I said how did a dude
do this on the floor of his apartment
zero help we'll never know I guess we'll
never know can't wait to take it apart
and sand it as mention you got to put
like little
racks where the is that in the drawing
yeah I did I read all 37 Pages where's
that in the drawing it it wasn't in the
drawing I was going to tell you it it
was just the one I mean I don't think
the Asian guy did it but he definitely
didn't do it yeah but the guy I watched
was like I was having weird cuz your
drawing didn't have any curvs in it
either so I had to adjust and then
change everything yeah you had
everything fit and was there was no gaps
in anything so none of it there were
gaps between the slats now yeah why we
put our cards in the table
here all right guys we have the whole
team out here and I have this much
confidence this is going to work oh no
this one's wrong who put the guys who
put a hinge on upside down that's just a
straight up Miss and I know I did
it I was going to say I wasn't here I
100% did it no I did the first uh 20 of
them Sam caught up to me on the last
seven go get my shop Shake so I'm
protected and look good and they're
comfortable yeah you look like up
until 2 minutes
ago go to your home are you too good for
your
home this thing
is what some might call the josa r it's
pretty baffling to me how much more
difficult this is than than I was
anticipating that one's too short for
like the whole thing how that happen
they all needed to be this long damn
it oh it's sliding it's sliding yes it's
sliding keep going hey keep going that's
it no we're almost there there's a
little bit more to go what yeah oh
goodness I'm scared no I think that's it
no he's like Chris is like no no why
what no so I think this is where the
measurements got dramatically off if we
look here we're touching in some a bunch
of these so my guy's drawing with a
on the floor all of these were up see
this line came up to go straight so
these slots were like super long for
some reason but I mean hey it works
though it kind of worked now we got to
see how the hell we can get that thing
to mount to the oh I see what you're
saying it still has to come back I mean
not really cuz it hinges on these last
two yeah but it needs to that needs us H
90 with the top okay well let's solve
that issue after we can cut that top
flush the tracks off already it up like
already severely moves the
track
two of them were too short then or we
could make it a radius and get real
fancy with there n Chris is like I
didn't build a single thing on this but
I don't want to do that everything
happening in my life right now I don't
like mostly this grab that give me that
level just another feat of like how the
did our dude do this on the floor
of his
apartment left hand oh it's was terrible
it looks kind of like
stupid hanging it's hanging great so you
do
this
oh that actually went kind of smooth now
this is
the damn
it I put so much work into this thing
for it to not work that one that one so
these three it's bottoming out in which
is interesting to say the least 7 8 9 10
well no 9 8 and 7B wonder why we're
almost home we're going to tweak this
slightly and then we'll give you a
little bit of a final
reveal right so we want this sucker
opening left to right and the parts to
kind of all align just to make sure
before I get too far down the rabbit
hole that screws something up I can't
fix it so we're going to make sure
everything's aligned for super goofy to
like get all this stuff to be square
they're close to square but it all kind
of still take some don't these go Yep
they're completely wrong we're probably
going to need a little bit of play just
for the sake of like movement be careful
what you wish for cuz a hinge goes in
here and here and here and here you
obviously can't have things be like
super butthole tight but that's looking
that's looking kind of neat huh yeah all
right next part this and this more or
less it's like two pieces of Walnut that
are 3 and 1/2 by 3 and 1/2 we're going
to have a pin attached to the bottom of
one and the top of the other is going to
float so that it can spin across I don't
know how I'm going to make that yet but
these two pieces need to go like this
this is going to hit like I'd have to
find a way to overlap them like cut one
into the other I just need to think of
how how can I do that and then have the
top one sit I think I'm just going to
cut these two parts come on follow me my
brain I don't know where I'm on a
different planet right
now I'll just cut them together and then
I can cut a lap joint like I've done on
the other ones in the part that's going
to have the curl to it so if that makes
sense I can I can cut I think I can do
that relief joint that should allow me
to get this to work and like I said I'm
going to have some play because of the
way this is built or for needing to have
a hinge in
it this is probably so hard to follow on
camera I'm sorry where am I I'm
literally just making up as I
go so this should kind of show you what
I'm thinking because obviously at the
moment it makes no sense if you look at
it from here I need these to line up
perfect and be 90° and then I need to
make half laps on the top and the bottom
because when you pull it up the top one
stays fixed and the bottom one rotates I
think so the theory in my head so far is
that so I'll clean these up a
bit there something that I think I just
realized I screwed up on you know as you
pull this these will pivot and then when
I get to this side they're not going to
like I I don't have enough room room for
it to open the whole way so I have to
have straight edges I can't have the
edges the way I have them now wonder if
that's an easy fix looking at it I think
I'm going to have to recut these these
holes got off
centered that's what we needed to do
though now that we know be a little
easier to do this time let's try
again they're still off damn it I'm
pretty sure so the mechanism works I
pull it out these hinges go down here
these hinges go up here and so I'm going
to use the same hinges we use on the
folding desk might just attach them and
see if it works and then come back and
mortise them in commence time lapse of
boring stuff all right so I'm super
excited that we are finally getting shop
Shades from the manufacturer which means
they're going to be hitting you guys
soon and I have to send a huge thank you
out there to all of you who have
supported the pre-launch especially
those of you who grabbed up the five and
10 pack bundles one of the perks of that
was I was going to shout you out on a
video so while I'm working on this
project I want to send a huge thank you
out to a ton of you guys I apologize if
I butcher them but we're starting off
thank you Ragnar uh Sigerson uh and
Hillmar Sigerson looks like a family
members buying some stuff together we
got Jesse Jensen thank you uh Casey
Lambert Kyle gillenwater Casper Leman
Emerson Gates Lee anetta Yehuda pter
Richard Irwin Richard ratmansky
Christopher SCH Scher sorry for
butchering that Brad Melaney Scott
storka William Park eigor epov Jimmy
shul Britain Kent Michael Temple Ricky
Bellinger spelled r i k Ki pretty cool
there Cody Williamson Justin Barber Ryan
feny Ryan o Conor Christopher R Hines
breed Danielson Cory duffel David Gordon
Bruno H La cointry Dustin Jones Whit
Evans Cory hilm Neil pson David
Rodriguez major Shong Peter buo and
Jeffrey Pard all of you bought a pack
and all of you are absolutely freaking
amazing I cannot wait to see what you do
with all of those shop Shades we had two
of you absolute animals purchase 10
packs this is the type of stuff that I
honestly cannot say thank you to enough
it allows us to make these videos it
allows me to spend stupid amounts of
money on increasing our production value
our team and making the projects go to a
whole another level because a lot of
those do get expensive so thank you guys
so much our two 10pack purchasers are
going to be Matt Lang you're awesome
thank you Matt and in this last name I
am so sorry if I butcher this I think
it's maid Petra Kowski if I mispronounce
that I am so sorry but I got to say once
again I couldn't do what I do without
all of you thank you so much for
supporting shop Shades they are going to
be shipping very very soon I am so so
excited for all of you to finally get
your hands on them I've been very much
looking forward to this this is the one
of only two pairs that we have that I've
just been holding on to I am so excited
to share them with the world now this
build is kicking my ass so let's get
back to it all right all the hinges are
at least mocked in the place and for the
most part everything is going smoothly I
am running into some squaring issues but
also the gaps that are in the hinges
this is something I thought I would have
to deal with but I kind of wanted to be
able to adjust once I got the hinges in
place now everything as you can see is
more or less working but we've got some
bigger gaps here gaps here small Gap
here but for the most part the hinging
mechanism is working I need to get it
pinned into place my concern here people
and this is where I probably should have
watched some videos on besides this Tik
Tok on people making these cuz I just
saw the Tik Tok I was like yep I can do
it let's send it when it's square like
this my box is actually a little bit too
small one so that sucks because now I
can't take a perfect measurement on
these corners and pin it I'm going to
have to do the corner pin on the box and
then index it to these parts and I'm
concerned so I want to get the gaps down
to where they're going to be final that
way any of the issues that might come up
because of the you know that little bit
of a different in the location of my
corner pins I want to be able to adjust
it easily not with like taking this
whole thing apart again this whole part
here this has got me stoked so we're
really really close here I'm going to
mortise these in the fastest way I can
probably I can think of and then we'll
get to finally install this thing and
get this cabinet wrapped
up so the gaps are a little bit better
and I think I'm just going to have to do
some handheld TLC but I am confident in
this next part so I need to drill a hole
for our Rod to go into we're going to be
using a metal rod I'm going to Mark
where I want my hole to be in regards to
my Corners here drill that in I'll then
take this little indexer that I can put
in and I'll be able to match up my door
and then from the back it'll put a hole
in it so I can have those perfectly
aligned to where I want them because
measurements are off slightly because of
how the gaps and how loose the hinges
are I don't know how to how to work
around that just being honest it's it's
kind of aggravating now I just get to
send it
sweet I'm really really hoping that even
though it's like slightly off it doesn't
make a huge difference in opening cuz if
that's the case we kind of screwed my
Guy Moment of
Truth damn it what's wrong why aren't
you
moving what did I do wrong what did I do
wrong I think I need to champer the
insides of these cuz I want to pull
apart
yeah it's still touching back here so
like you want it
to do the same thing on both sides I
think I might have to do this side too
hamper cuz that hold it back oh boy is
that Jank that is janky as hell but it
kind of works worked so I'm
close
no oh broke I was trying to put a clamp
on it to be responsible can't can't take
your eyes off of it around here damn it
hey let me think all right so we're I'm
dealing with a few things here one I I
broke this so I threw some CA glue on it
I need to fix it but it has me wondering
if there's a better way but two I have
to take the play of this horizontal
plane this this plane in order to get
this stuff to actually function so to do
that I think I'm going to I was going to
put a nut on these I was going to thread
it and then nut it on and then have that
just kind of like look decent but I
think there's a better option if I just
run to the hardware store I can get like
a hex hex screw for for a threaded part
here because when that holds closer to
it it'll eliminate the play that's
coming into it in um the other planes I
went back and I watched the video of our
guy and check this out he has a part
inside of his door handle you can see
the slot on the end there he has two
pivot Points in the top and the bottom
but his pivots on top and bottom with a
handle and it has a latch so I'm just
going to do that should go pretty quick
I'm pretty pumped because I'm pretty
stupid but sometimes I have good ideas
so we got all these brass hinges on here
already so Walnut and Brass do look good
together so I was at the store I was
like our dude in the video he used black
hardware and I was like all right well
how can I do something similar so I
started looking around and they had some
pretty nice looking brass plated hard I
can fix these holes and redrill them um
and you won't see it because these nice
fat heads and then I can put a threaded
insert in here and the holes we already
drilled here that will allow me to use
this nice looking faster on the front
than we're matching here this one's a
little bit more polished and then I can
rebuild this over here to use that plate
mechanism that the dude had in his I'm
going to recut these parts here though
cuz these are super easy to put once I
have them Square they'll be good I'll
cut the internal aspect that will make
those fit nicely I'm going to get these
on here first so I can show you what I'm
talking about that should be an easy fit
I'm stoked this is looking good drink
like a coffee on your way to the door no
I'm fuing
inspired tell the hardware is now it's
going to hold the face down so as I pull
it it moves a lot smoother still need to
fix this issue but the issue that was
there with that stuff popping off see
how that's staying way tighter holy
yeah so like I wanted to address that
before we did anything else crazy
that now I got to fix out they're just
coming in like it's crazy angle I did
have to champer the living out of
this so I probably have to do that over
here this one has a little bit of play
but I now know that the mechanism is
going to be good to go now I can fix the
handle and once I take the play out of
that be pretty pumped this part is here
is is solved though which which Joe and
I were concerned about cuz it it looked
like trash I'm so glad I went back and
watched that dude's video sometimes you
just need to take a dump and watch
someone's video cuz I know most of you
are watching this video on the toilet
right now don't you lie to me you
commented on it on the last time I made
that I make good pooping content all
right to solve this next issue isue I've
got another piece of wood here and I'm
going to cut these two blocks again
you're joking not another one and then
I'm going to cut a spline inside of it
where I'm going to add a piece of metal
where I'll be able to have a pivot point
on the top and the bottom just like our
dude did so when I pull this out these
stay in plain they should stay in plane
the issue I'm having is that I suck and
then I built a sucky thing and there's a
lot of slopp so when these are in these
stay in plane the whole time therefore
that integral pivot should be good I was
feeling pretty shitty feeling pretty
good yeah we're getting
close Al so like I said this needs to
stay in plain should it be a bigger
piece is the question essentially what
we need is for this to
stay like that and go around see how it
still turn it'll be pinned in a perfect
world that's what I should do that's
what I'm going to do okay so I'm going I
take the center of that my piece here
it'll sit perfectly here and here and
then as it turns and then I know exactly
what's cut there
we try to make sure that stay centered
on the piece and give myself a slight
Gap okay so that's got free rotation
there I'm going have to open up this
side because I might have to round those
edges I want this to go into
here should be going through there now
what we got to do is get these two to
turn there's not enough Gap in there
then to turn at the same
time all right and we're going to find
out Joe are we
ready all right well now we're getting
somewhere we need some TLC on this fit
but that's better than where we
were so I've been fussing with this all
morning and we're pretty damn close the
new handle kind of is a little bit
finicky so I put this barrier or this
part here that I have some magnets in
you can see I put magnets here and here
they're not like the strongest magnets
they're just Home Depot neodium which
you know I'm glad that they sell Home
Depot neodium now but they're not great
but for the most part it's looking damn
good the new mechanism is working good
it comes the whole way out door opens I
think all I need to do now is I'll take
it apart I'm going to do some some
tidying up and then I want to actually
drop in um some some Plexi in here I get
a back panel cut and then this thing
will be a wrap couple more cuts get that
glass in she's almost
done okay cut some
Plexi and for the most enjoyable part
about working with acrylic sand your
Edge want to use a fine grit and get all
the scratches out you peel your paper
off you now get to polish the edge with
the flame
make sure you torch the under your bench
so
satisfying sanded up looking legit now
it's time for spray in the words of our
forefathers let us
spray
both of these turned out pretty cool I
will say way more difficult than I
thought took me way longer than I was
anticipating let me know what you think
about both of these projects thank you
so much for 1 million subscribers I
freaking love each and every one of yan
and after you hit that subscribe button
let me know what are we going to build
next
4.7 / 5 (46 votes)